Quantcast
Channel: Mrs Thomasina Tittlemouse
Viewing all 167 articles
Browse latest View live

Snow Week Chez Moi

$
0
0
Snow beginning ...


Snow settling ...


Snow warming ... 


Snow melting ...!


Sargasso Sea-Ripple

$
0
0

Some of you may remember me beginning my sea-ripple blanket back at the end of August / beginning of September last year, inspired by the constantly shifting colours of the sea that had struck me while by the coast, in Dorset, earlier in the summer. It all began swimmingly and I took, what I thought was a lot of care in sorting out the array of colours and arranging them in an order which I thought would work. It's a big blanket, (or will be), so, of course, it's yarn-hungry. I had chosen to use Debbie Bliss Baby Cashmerino primarily because, although it's expensive, it comes in the most wonderful range of nuanced colours and this is what I was after - the pale silver and white of a cresting wave or breaking ripples slipping onto sand, the eau de nil and translucent pale greens of shallow water, the deeper teals and turquoises of mid-depth lagoons and the whole range of blues, through to violets of the open sea in its different moods. Of course a lot of these colours I had to buy, but some I already had left over from other projects and in the cause of thriftiness, (or at least in opposition to downright profligacy!), I wanted to be as economical possible by using any colours already in my stash that seemed to fit the overall palette. With hindsight, this was, at least partially, a mistake.

To begin with, all went well and I fairly quickly hooked up the first run of stripes, two rows of each of the twenty seven colours and had even begun the first few stripes of the second run. My sea-ripple then became becalmed like the Sargasso Sea and not a breeze or breath of wind disturbed its hooky surface! I told myself that it was a "WIP" and that the reason it was not progressing was that I was "busy with other projects over the autumn". To some extent this was true as I was making a number of things as Christmas presents to give away and there are only so many hours in the day, free from work, in which Mrs T can hook away, but "being busy with other projects over the autumn" was not the real reason it had become becalmed.

I got it out again a couple of weeks ago, after months with nary a ripple disturbing its surface. Fortunately there were no eels in its sea-weedy folds, unlike the real Sargasso Sea, or mercifully any other livestock for that matter(!) but the depressing truth hit me that the real reason that it had become becalmed was that the Colours Were Not Working and on closer inspection there were specific colours that were playing out of tune with the rest. And yes, you've guessed it, the rogue colours were principally those ones that I had already had in my stash and thought I could eke out the new ones with. The worst offender was a soft heathery purple which I had had a slight reservation about originally but which I had suppressed. Unfortunately this colour had come early on in the run of stripes which meant that in order to remove it I would have to frog virtually the entire thing. Eeek!

But once I had seen the purple for what it was - a cuckoo in the nest - there was nothing for it. So frog it I did, much to the chagrin of Duck, my crochet mascot, who regards frogging as a dirty word and an even dirtier concept! He has a particular penchant for blankets and when he realised what I'd done to what he thought was a blanket almost a third of the way through, he was most upset, as you can see and did all he could to stop me frogging any more!


Here he is nursing what remained of the blanket at the end of the frogging, i.e. not a lot!

In the process of frogging my hours of work, I discovered that the purple was not the only "cuckoo" - the pale sandy colour, "String", also had to go and two greens that had, like the purple, come from my pre-existing stash had too much red in them and were jarring painfully with the blue tones of the rest of the colours.

Before frogging out the "cuckoos"
Although the frogging was rather drastic and, I have to say, filled me with dismay when I realised it was necessary, it's taught me quite a lot.

1 It is not always easy to predict in advance how colours will work together in a large scale piece like a blanket just from seeing the colours in the skein or ball, even when set out in the order in which they will appear.

2 Even colours that do seem to work together, play differently and sometimes unexpectedly in an overall run of repeated stripes.

3 If a project gets becalmed, it's probably because something fundamental has gone awry and it's worth fixing it rather than just ploughing on and not loving it. Having frogged out the "cuckoos", progress is now flowing again and much more easily and enjoyably. I like to have several projects on the go at any one time - small things as well as a bigger thing - but if the bigger project never gets picked up, something's gone wrong!

4 Thrift is a virtue which most of us are conscious of the need to cultivate but it needs to be deployed carefully. The waste of money, if I had simply never finished or enjoyed the sea-ripple, as it started out, would have been shocking. Better to bite on the bullet of the artistic requirements of a project and save up, if necessary, for what it needs, than spoil it, by cutting corners for parsimony's sake.

5 If your instinct tells you a colour is not quite right, it probably isn't!

6 Lucy of Attic 24, in her interview in Simply Crochet, a while back, which you can read about in her post here, made the point that for any crochet project - and I guess especially for a big one such as a blanket, - it matters that everything about it should make the heart sing - the colours, the yarn, the pattern. She is so right. If those things are not making the heart sing, the Sargasso eels may have the last word!

7 Frogging is not the end of the world. It cost a pang to undo so much but it hasn't taken nearly so long to make good again as I thought and not a scrap of yarn has been wasted. The yarn that failed to sing in the sea-ripple will sing elsewhere, I am sure, and everything else has simply been recrocheted back in place. So if your fingers are hovering over something that you think in your heart of hearts needs frogging, I'd say, "Plunge in and get the awful sense of unravelling over so that you can begin again!"

After recrocheting and omitting the "cuckoos"
And if your heart fails you, remember the literary queen of frogging in Homer's Odyssey, Penelope, who spent all her days while waiting for Odysseus to return home, weaving a beautiful cloth at her loom. Odysseus' long absence had raised the hopes of a raft of uncouth suitors who had taken over Odysseus' house and were hoping to pressurise Penelope into remarrying one of them, for surely after all this time Odysseus would never come back.

Penelope however, being a wise and canny lady, with no flies on her, in order to buy herself time, promised she would choose one of them when she'd finished her weaving. The suitors accepted this but what they did not realise was that every evening, by torchlight, Penelope frogged all the work she had done during the day thereby ensuring the weaving would never reach completion! Every evening for three years, unravelling the whole day's work - can you imagine?!

You might think the suitors would have noticed that the cloth never grew but luckily they were so befuddled with drinking the wine from Odysseus' cellar and making merry in his great hall that for three years she got away with it and they were only alerted to her ruse when one of her maids gave her away.

Fortunately for all concerned, at this point Odysseus does come back and the suitors' game is up. I like to think that in the peaceful aftermath of his return, as Odysseus sat by the olive-wood fire in his own hearth, drinking the dark wine from his Ithacan vines, out of his two-handled golden cup that Antinous, one of Penelope's suitors, had once rashly dared to appropriate, but never in the end drank from, he told the magical stories of his adventuring journey back from Troy and Penelope went back to her weaving. And instead of making a future shroud for her father-in-law, Laertes, which was the original purpose of her work, she perhaps turned it into a tapestry incorporating scenes and pictures of what she heard and she never unravelled a single stitch! And when Odysseus' storytelling finally came to a close, the tapestry was finished and was hung beside the great bed Odysseus had made himself, with a living olive tree acting as one of the bedposts, a glorious and triumphant riot of artistry and workmanship attesting that frogging never has the last word!

Anyway, now that progress is advancing happily on my blanket, I find I have more than made up for lost time. It is now again almost a third of the way through, although I may have to do more than my expected three runs of each set of stripes - taking out four colours from the original scheme in total means the blanket will be about 12"shorter than anticipated if I don't add some additional repeats.

But never mind! My Sargasso Sea-Ripple is no longer becalmed! And my frogging pales into insignificance beside Penelope's!

I am also happy because, inspired by Kat at Needles & Natter who has made lovely colourful handles for her crochet hooks - red and blue ones spotted with cheerful white polka dots and a fabulous stripy rainbow one too - and armed with her instructions as to how to go about it, I have turned my boring old grey aluminium crochet hook into a more sprightly, daisied version using some oddments of blue, white and yellow Fimo polymer clay. To be strictly truthful I think I should have made the handle slightly longer down the hook but the supply of available Fimo in the house was restricted to what H had left behind from a modelling fest a while back and I had to make do with what there was. It felt a bit strange using it for the first couple of rows but now it feels very comfortable in the hand and I just love the look of it!


The passage from Odyssey Book 19 in which Penelope tells the story of her cleverness at unravelling her weaving for three years to the stranger who will turn out to be her long absent husband. Homer in fact tells the story twice. The first time at the beginning of the Odyssey in Book 2 when the suitors indignantly recount the story of being hoodwinked by Penelope to Telemachus (Odysseus' son)  but I prefer the second account when Penelope tells the story herself!
Do you have any dramatic frogging experiences that give Penelope a run for her money? Or any becalmed projects? I'd love to hear any tips you have for dealing with them.

Happy Weekend Everyone!


In My Kitchen In January

$
0
0
I've wanted to join in Celia's inspired "In My Kitchen" series for a while. It's a lovely way of keeping a record of what goes on in the heart of a home. And you can tell a lot about the the weave of what's going on in the rest of life, way beyond the kitchen, from the ordinary warp and weft of kitchen doings.  I love the hidden stories that such everyday things tell. As January is nearly over and it would be nice to look back at a year's story of what's been happening in my kitchen at the end of 2013, I am posting this only just in time but better late than never!

The story my kitchen has been telling in January is through...

... Nürnberger Elisenlebkuchen made according to a German recipe I found here in my search to recreate those delectable, soft, German, spiced cookies that sometimes come in lovely musical box tins which play "Silent Night". I have tried my hand at various Lebkuchen recipes over the years but until now, have not got it right. I discover that the secret is that the "echt" version contains no flour and a lot of candied peel. Although my German is sketchy, I think I have more or less figured the recipe out correctly and the results are extremely moreish. Just as well as the recipe made over sixty cookies! The biscuits sit on round wafers called "Oblaten" which, if you are in the UK, you can get from the German Delicatessen here. They are a bit like the large priests' wafers used at Mass. You could always use rice paper, torn or cut into squares as an alternative. You need something though, as the Lebkuchen are soft and quite sticky. They should be kept in a tin before eating and they do improve over time although they are extremely good straightaway, if you are greedy, like Mrs T, and can't wait for them to mature for a week before trying them!


... My Procrustean chopping board! Procrustes was a very unpleasant individual in Greek mythology who forced his guests to sleep in a particular bed. If they were too tall, he cut bits off them and if they were too short he stretched them on a rack. Nasty. Like all the best stories it has an underlying message and the myth is alluding obliquely to the human desire to make the world fit ourselves rather than the other way round. Not good. Anyway, I digress! My chopping board is Procrustean because although I don't stretch it, I do keep chopping bits off it! I bought it originally from the market in Sansepolcro, in Umbria, about ten years ago to replace an old mahogany one my grandfather had made my grandmother in the 1940s. Used by her, and then me, everyday, it gave way under the strain and had to retire, at least from everyday chopping duty. This one was a bit of a bargain but it was too long and rather heavy so it had an inch sawn off the end. The truncated version was just right but unfortunately constant use and washing and then drying on a drainer that does not drain very well, had caused it to split and worse, develop a most off-putting culture of black mould. In her January mood of noticing and clearing up mess and clutter, Mrs T held up her paws in horror and decreed another inch had to be sawn off! So here it is, still with some visible splits, but hygienic again and I am trying to allow it to dry, after use, more carefully.


... Carrot and red lentil soup with dill - snow food when everyone was home and hungry and I couldn't get to the shops. Very good actually. Just an onion, a bit over a kg of carrots and about 100g red lentils cooked in the pressure cooker for five minutes with a litre of homemade stock and blitzed to a nice, thick, comforting puree with a bunch of fresh dill, past its sell by date, but still apparently in the land of the living.


... Chai latte spices mixed according to Anne's wonderful recipe here waiting to be made into frothy chai lattes like the one below.


... Tins too nice to throw into the recycling bin. I confess it, I am a sucker for nice food packaging. I buy both olive oil and wine because I like the labels as much as for the contents! The French olive oil tin came from Waitrose and the olive tin H brought back from his Greek trip in the autumn with the fattest and most splendid kalamata olives inside, that either he or I had ever seen. Now that both oil and olives are spent, the tins are sitting on my kitchen windowsill while I wonder what to do with them. Possibly I might grow herbs in them. They are far too jolly to throw out, anyway.


... I said I was a sucker for packaging! This is a special edition ceramic Marmite jar that contains, not Marmite, although it did originally hold a tiny pot of the stuff when I bought it, but newly-whizzed-up porridge oats which I blitz in the food processor, a bag at a time, to make my own version of instant porridge for breakfast on winter mornings. Much cheaper and nicer than any commercially produced, "instant hot oat cereal". Normally I am in too much of a rush to add anything fancy but there is always time for a quick swirl of maple syrup as in the pic below!


... My new hyacinth-blue, flower-pot jacket, that I crocheted to cover a pot of budding hyacinths brightening a corner of the kitchen work surface. I used the remnants of a skein of beautiful, variegated Noro Light Silk Garden yarn left over from a recent make and I'm rather pleased with it, not least because I designed it myself and it worked!


Have a look at Celia's inspirational blog Fig Jam And Lime Cordial for her wonderful culinary explorations and to see what is going on in kitchens round the world!


Inspiring Hooky Books

$
0
0

I have recently acquired two inspirational hooky books. One is this:


It was just too beautiful not to buy it, I am afraid. Obviously the patterns in it are designed for using Noro yarn - the incredibly beautiful (but also incredibly expensive) Japanese variegated yarn of the gods. But there is nothing to stop you making substitutions and there are a lot of beautiful and much cheaper variegated yarns out there to experiment with. 

I am drawn like a moth to a flame by the allure of variegated yarn - I find it magical and provocative. It is also rather unpredictable and what you hold in your hand in the skein may, or may not, give an impression of what will happen when you work it up.  You never quite know how the colour will "pool", whether beautiful, variegated stripes will appear, as if by magic, or whether you will get a bit of a mish-mash of random colours. I find that unpredictability and "hiddenness" exciting and although I've had one or two unsuccessful attempts using variegated yarn that have definitely resulted in the mish-mash, random category, when it works, it really is beautiful.

Because my hooky moth wings have been singed so to speak, by my less successful experiments on occasion, I began cautiously, in response to this book, by buying just two skeins of Noro Silk Garden Lite yarn to make the Bobbled Mitts designed by Karen Garlinghouse. You could probably get away with just one skein, in terms of the amount of yarn used, but of course if you want your mitts to match you've got to start the colour gradations at the same point, which means buying two. As it was, I only originally bought one and had to buy another from a different source, which (of course) wasn't from the same batch so the colour run wasn't identical. This means my mitts are almost, but not quite, a pair. The discrepancy is only in the cuff and I quite like that, actually.


The pattern was very clear and I liked the idea of stretching my skill set a bit and making the ribbed cuffs for the base and the bobbled, textured fabric for the body of the mitts. Because the Noro Silk Garden Lite does not unravel easily, once crocheted, without snagging and breaking, I made a dummy cuff first in some ordinary acrylic yarn to get the hang of the Front Post Double Crochet and was pleased I did, as it ironed out a few glitches which would have been difficult to undo in the more temperamental Noro. My experiences of trying to knit ribbing as a child had put me right off any pattern requiring ribbing - I found / find the K1, P1 thing tedious and tricksy. Hooky ribbing however, I found a breeze and I love the almost knitted effect the cuffs have. 

The bobbles were very easy indeed - no special stitch required, just taller stitches interspersed among shorter ones which have the effect of concertinaing and buckling outwards as subsequent rows are added giving the textured, bobble effect. 

Leaving on one side the happy texture they have, it's the colours that make these wrist warmer mitts instantly among my favourite garments. 

 No mish-mash effect here. Just beautiful, vibrant shades blending and contrasting with one another in perfect harmony. 


Other tempting patterns in the book include this very beautiful Chrysanthemum Shawl designed by Anna Al ...


... the Flower Blossom Purse designed by Yoko Hatta


... these gorgeous, scalloped variegated Nesting Bowls designed by Jacqueline van Dillen


... and this Felted Tote bag designed by Marty Miller


Of course, all these will use a lot of yarn so unless I substitute something cheaper for the Noro yarn, a lot of saving must be done before I can start on any of them, but give me time!

The other book I have acquired is this one:


I saw this at the Knitting and Stitching Show back in the autumn last year but didn't buy it. But you know how it is, an idea is sown and germinates and begins to take root and before you know it, you are wishing you had not passed up the opportunity to acquire the book which tells you how to grow the  ideas that are now spindly seedlings, requiring potting out! Fortunately the book is obtainable on Amazon here

I've been toying with the idea of making a crocheted shawl for a while. A good bit smaller than a blanket but with many of the feel-good factors that blankets have. The book is an eye-opener. Partly because it is filled with a wonderful and varied range of shawl patterns for all skill levels but more significantly because of the movement, originating in the US, behind the book. These shawls are not just any old shawls, they are "prayer shawls" that come from individuals and groups, making shawls to give away with the specific intention to communicate blessing and comfort to the recipients. The making of them is intended to be, and clearly is, a spiritual experience in which the maker's prayers are woven along with the yarn into the finished article. Understandably this has a profound effect on both maker and recipient even if the recipient is not specifically known to the maker. Did you know that there are whole "prayer shawl ministries" out there? I didn't. 

Well, Lent is coming up. Instead of the whole giving up chocolate / alcohol etc saga which seems to me is often more about losing weight and accruing a few health benefits than anything else, I'm going to make a few of these and give them away. 

Like the wrist warmers, the patterns will stretch my hooky capabilities a bit and introduce me to new stitches (V stitch, flower stitch, crown stitch, crossed stitch, etc) and even beading, as in this lovely bobbled shawl by Jan Bass that was made for someone partially sighted and therefore includes lots of texture in the shawl fabric and different-shaped beads and charms at the edges to major on feel-appeal rather than just visual effect.


Some are more complicated than others but there's plenty to choose from, for every skill level. They are mostly worked up on quite a big hook and chunkier yarn than I normally use which means they should work up fairly quickly. Bring on Lent, I can't wait to start! 

I love this variegated pink clover leaf version edged in green designed by talented crochet designer, Robyn Chachula


... and this one in deep, variegated blues with pockets by Sheila MacNeil


... as well as this lighter, lacier version, hooked in double strands of fine, lace-weight, gossamer mohair by designer, Donna Hulka.


The book also contains a fascinating commentary about the significance of different types of stitch, pattern and colour so that at every level a shawl "speaks" with symbolic significance a bit like the Victorian language of flowers where a purple pansy, for example, was not just a pansy, but a conveyor of the message "You fill my thoughts". Not to be confused with a mixed purple-and-yellow pansy, which meant "Don't forget me."!

The Crocheted Prayer Shawl Companion is obviously written from the perspective which gave rise to it. You may not find that perspective very familiar or even congenial, especially here in the UK, but don't let that put you off either the patterns or the beautiful idea of making something like this to send someone a tangible hug who needs it and perhaps experiencing something profoundly spiritual yourself, in the process. Although in origin the "prayer shawl ministry" idea is Christian, I defy any compassionate human being not to find something here that resonates, whether you share a Christian faith perspective, another faith perspective, or none.

Now where is my chunky hook and some nice, soft chunky yarn?! I think I might just start Lent early this year.

Anyone else recently come across any inspiring hooky books they'd recommend? A girl can never have too many of them (like bags and shoes!)

Ed to add: there's a lovely new hooky book about to come out, written by the super-talented Sue Pinner of "the 8th gem" fame. The book is called "Granny Squares - 20 Crochet Projects With A Vintage Vibe". It's not published until May but you can pre-order a copy from Amazon here. If the book is anywhere as inspirational as Sue's blog we are in for a treat!


Crochet And Pom-Pom Hearts

$
0
0

Couldn't pass up the opportunity to hook up a few of these cushiony hearts after seeing Lucy's post here last month. The pattern is the same lovely one by BeaG that Lucy used which you can find here. I've used my favourite Cascade Ultra Pima cotton yarn in a range of Spring-inspired colours and a 4mm hook and I love them!


I thought they would make nice lavender bags, both to keep and to give away as small presents, but of course the crochet is a bit porous and the lavender flowers have an unhelpful tendency to make their way out through the crochet again instead of staying fragrantly put. Not being keen on finding bits of scratchy lavender in my clothes and suspecting that anyone to whom I might give one of these, might not either, I made little pillows out of loose weave muslin to fit inside. The muslin was in fact an unused jelly-straining bag that I cut up, and stitched by hand into small pillow shapes, filling them up with lavender before the final seam - perfect, loose-meshed fabric for allowing juice to drip through for jellies or to keep lavender from making its way out of my crocheted hearts!


The little lavender pillows sit nicely within the crocheted hearts and I just filled out the remaining space with soft toy filling. This was also an economical way to use my precious Provençal lavender, as you don't need so much just to fill the little pillows as you would to stuff the entire heart and they are still beautifully scented.

I played around with various flower patterns to embellish the hearts and in the end plumped for the Centifolia Rose in Lesley Stanfield's 100 Flowers to Knit and Crochet, making some in two colours and some in single ones.


This coming week, with Valentine's Day in it, is my excuse to go fuzzy, pink and girly.


In a predominantly male household, "fuzzy, pink and girly" is not often welcome, but every once in a while I feel the urge to give in to it, regardless of disapproval ... so I've also had a go at making some pink heart-shaped pom-poms with ... a pile of pink yarn


... and a pair of those heart-shaped pom-pom-making gizmos.


The heart-shaped pom-pom-making gizmo is slightly daunting compared to the simple spherical and oval pom-pom-making gizmos I had as a child (and still use). But with a bit of perseverance I managed, more or less, to get it to work. If you acquire one of these to have a go yourself, (you can get them from Purplelinda Crafts here), do read and follow the accompanying detailed instructions carefully and take my advice: not a single word in them is superfluous!


There is quite a bit of happy snipping involved in order to shape the results properly which was rather enjoyable and created a lot of pink fluffy mess everywhere.


I've always loved wielding scissors and snipping away, whether it's paper, fabric, yarn or hair on the receiving end of my attentions!

As a small child I was so taken with the glamour of using scissors that Really Cut instead of those dreadful plastic "safety" scissors that wouldn't cut anything and with which I was generally fobbed off, that I tried to "help" my mother's dressmaking efforts by copying what I'd seen her do when cutting out a summer dress for me. It was rather unfortunate that the fabric I cut was the pieces she had already cut out for the dress! As you can imagine, I was not very popular! Not that I blame her. I would have been pretty livid in her shoes, I can tell you!

Nor was my popularity rating high when I led my sister astray into cutting the hair on a pair of dolls we had. My doll ended up with quite a pretty, gamin kind of bob, but L didn't know when to stop nor, aged only three at the time, did she realise that the doll's hair would not grow back after cutting, so it ended up with a very comical, and irrevocably drastic, crew-cut! I am afraid, at all of six years old, I unkindly laughed the superior laugh of the knowing older sibling but my poor sister was rather upset and my mother was not at all pleased!


As you can see, I need outlets for my happy snipping tendencies and these pom-poms fit the bill nicely - I particularly love the ones made with the variegated pink yarn - Patons Fairytale Dreamtime Baby DK, if you're interested - and there were no tears or fall-out apart from the pile of drifting pink fluff all over the floor!
Pink dust bunnies anyone?!


In My KItchen In February

$
0
0
Joining in with Celia's In My Kitchen series here, in my kitchen, in February, have been the following:

... Leek and Herb soup


In February I seem to hanker for food that is plainer and packed with vitamins after the more sumptuous offerings of the post-Christmas period that extends into January. Things like this vivid green soup, which is my own recipe. It's very simple and although it uses plain water, not stock, it doesn't taste at all thin. I use 4 largish leeks, washed, trimmed and chopped, and about 12 oz / 300g of potato, peeled and diced, which I sweat in a spoonful of olive oil for a few minutes. Add 3 tsps salt (sounds a lot but you are not using stock so it needs more than you might think), plenty of black pepper and about 1.5 litres / 2.5 pints of water. I cook this little lot for 6 minutes in the pressure cooker and when it's done, I open up the lid and immediately stir in a bag of washed wild rocket and a great big bunch of flat leaf parsley, (about a 75-100g / 3-4 oz bunch roughly chopped, leaves only). Wilt the greens in the hot soup for a minute or so and then whizz the soup in the blender. Made like this, it keeps its vivid colour and all the associated vitamins beautifully. And if you think that amount of parsley is too much, let me tell you, it isn't! The strong, verdant flavour that raw parsley has, gets softened to something much more subtle in the wilting process and the soup tastes delicate, fragrant and unexpectedly savoury for something that you might think would have needed bolstering with a good chicken stock.

... Carrot and Almond Muffins


Strictly speaking, I think these do not qualify as muffins because the method and ingredients are not those of classic muffins so they probably ought to be called Carrot and Almond Buns. Buns or muffins, these too are part of my plainer, vitamin-packed, February fare. And again this is my own recipe. Very simple and easy.

Peel and coarsely grate 200g / 7 oz carrots and set aside in a large bowl.

Chuck the following in the food processor and whizz to a nice smooth consistency:

200 ml / 7 fl oz almond oil (you could substitute another vegetable oil, if you prefer, but I like almond oil for the vitamin E it gives)
175 g / 6 oz light soft brown muscovado sugar
4 large eggs
1 ripe banana, peeled

Now add:

350g / 12 oz white self-raising flour
1 tsp cinnamon
1 tsp ground mixed spice
100 g / 4oz ground almonds

Whizz again to a produce a nice smooth batter. Tip into the large bowl where the grated carrots are waiting and fold them into the mixture. Spoon into about 15 muffin cases (see, I told you they were muffins!) and bake for 20 -25 minutes at 170 - 180 C until well-risen and golden. They freeze beautifully.

... oranges wrapped in tissue paper


I know, it's my food packaging thing again! I love these oranges, individually wrapped in tissue paper from Spain. I cut the outer peel off with a sharp serrated knife and then cut each segment free of the pithy membranes on either side to make a simple orange fruit salad. Delicious. Although they are a fiddle to prepare like this they are just so much nicer to eat when freed from all that white pith.

... shortbread


This again is plain, but good. I find substituting some ground rice for some of the flour gives the best and crunchiest texture in shortbread. Semolina also works well if you can't get hold of ground rice but I find ground rice is best. I substitute about 2 oz / 50 g ground rice out of a total weight of 12 oz / 300g flour. I also cook the shortbread slightly beyond what a purist would probably say I should, that is to say, I prefer I prefer it to go one stage beyond the pale gold of commercial shortbread until it is a slightly darker brown. It improves both the flavour and the crispness. Be warned, this may seem plain but it disappears like greased lightning, in my kitchen anyway!

... one of H's targets from his .22 rifle shooting sessions at school


Sadly the days are gone when H used to come home with bright, jolly paintings and wobbly cardboard models to stick up on the wall or perch on the top of the fridge but instead, the kitchen walls now sport a lot of these .22 rifle targets. This one comes from an inter-school competition at the beginning of the month and shows his best shot to date. Two shots to be precise. Two consecutive shots straight through the centre of the bullseye. He ascribed this success to luck and when I said it couldn't just be luck I got a long and complicated explanation about the trajectory of a rifle bullet and the infinitesimal environmental variations that occur that mean luck as much as judgement were at play. As I don't shoot, myself, I can't comment on this but it seems an impressive result nonetheless and whether fluke or skill, it has now joined a number of its fellows behind the geraniums on the kitchen window sill!

... my new crocheted red dishcloth complete with heart pattern

Lots of people have been making dishcloths recently - have a look at Astri's fabulous ones here and with St Valentine's Day this month I got it into my head that I fancied a red one with a heart motif. I was sure I had a pattern for a small bag with a heart motif which I thought could be adapted to make a dishcloth but I couldn't find it anywhere. I think I must have lent the book to someone and failed to retrieve it. Nothing daunted, I had a little hunt on the Internet and found just what I was looking for. Here it is:


The pattern is by Donna Mason-Svara and you can find the pattern on her blog, Smoothfox here. She has lots of lovely innovative crochet patterns listed on the right hand side and you'll find the one I used under the heading "Heart Square". (check out her beautiful round and star-shaped afghans while you're there - they are amazing!) The "Heart Square" is  exactly what I had in mind for my purpose and is nice and holey which makes it hygienically easy to rinse and dry. I made it in red Puppets 8/8 cotton, like my face flannels last year, as this yarn can be washed on a hot cycle.

I say "can be washed on a hot cycle" but it hasn't been yet because I haven't yet had the heart (sorry!) actually to use it. It looks so nice that seizing it to wipe the breakfast table seems a bit boorish but I tell myself, I made it to use it and must stop being precious about it! Someone will knock over a mug of tea or hot chocolate soon and I will grab it as the nearest thing to hand with which to mop up the mess, which will break the ice, but so far, I am quietly admiring it in its pristine state!

... heart-shaped, home-made custard creams for St Valentine's Day, with tea in one of my new spotty mugs which I don't need, but couldn't resist when I saw them in a sale.


Have a look at Celia's blog, Fig Jam and Lime Cordial for sightings of other February kitchens!

Song of Solomon Shawl

$
0
0

As indicated in my previous post here, for Lent I'm not giving up anything essential like chocolate, biscuits, tea or, heaven forbid, cake - these, in my book, are survival rations, not optional extras to the daily round, I am afraid, - but I am taking up the idea of making crocheted prayer shawls to give away. It's been interesting. And a bit different from my other projects.

Firstly I had to curb my starry-eyed enthusiasm for the more complex patterns in the Prayer Shawl Companion book and limit my choice to a pattern that I could commit to memory easily. Otherwise there was a risk of Starting, But Not Finishing. So I had to abandon the lovely pale pink Clover Leaf Shawl designed by Robyn Chachula that I had a hankering to make and opt for something simpler. But what? Careful perusal of the book made it clear that nothing about these shawls is meant to be happenstance. The stitches are symbolic; the overall pattern they make is symbolic; the colours are symbolic; the whole project is pregnant with meaning and everything carefully chosen for the message, it is hoped, it will carry to the recipient. As a result, it took me longer than I thought to make a start because the choice at every turn had to be weighed carefully.

In the end, I chose the pattern in the book entitled "Lattice Shawl", contributed by Mary Bell. It's a simple repeating pattern of three open-work rows of "V" stitches worked on top of one another framed by denser rows of (US) double crochet stitches either side. The open form of the "V" stitch lends the pattern the appearance of a trellis or lattice-work fence such as for climbing roses, scented jasmine or clematis with their big, plate-like flowers. I am going to be sending this shawl to a friend awaiting surgery, whom I can't be with in person, so the suggestion of support in the background provided by the trellis pattern seemed appropriate.


So far, so good. Now for the question of the choice of yarn. I'd already decided to explore the potentials of variegated yarns for these shawls on the grounds that they would provide variation of colour without my needing to cart round umpteen different balls of yarn - if I didn't make the production process as portable and user-friendly as possible, I was concerned it might get bogged down. I bought a handful of sample variegated yarns from my LYS and for this shawl I used "Passion" yarn by James Brett in the colour-way P2. It's a variegated chunky acrylic / wool mix. The colour "P2" doesn't sound very attractive does it? But despite its prosaic name, it's beautiful. The colours, ranging from blue and violet to peach and orange mixed with green, pink and some neutral earth-tones, are soft and gentle and it's deliciously light and silky.

The colours remind me of a garden at the beginning or end of the day. There is quite a bit of green - the green of new shoots, bright and alive in early sunlight. There are accents of mauve, pink and tangerine - blossom in the dew or at dusk. There is a streak of deep, vivid blue - the sky just after sunrise or before sunset. There  is some soft grey, charcoal and a touch of taupe - velvet shadows beneath a spreading tree or shrub at twilight - translucent and gentle. These impressions were not all self-evident when I picked the yarn off the shelf - I just liked its soft rainbow palette - and what has been interesting during the making of the shawl is the way that the images developed and with that, related wishes and prayers for the recipient.

I hope it will speak to her of hope and newness, of the reassuring cycle of life that is a constant in a society of so much change and uncertainty, of the basic beauty and goodness of the creation and its Creator, of the subtle complexity and mystery that are woven into the fabric of life and the warmth of relationships that sustain and support. I hope it will speak of the promise that each new day brings and echo the peace that should bid farewell to each one that passes . And even if it doesn't quite say all this, I hope it will be warm and comforting on days that need a bit of warmth and comfort.

The pattern was simple to remember and, hooked up on a 6 mm hook, it took shape nice and quickly. So no risk of failure to finish! On the contrary, it is now ready to be packed up for its journey across the Atlantic.

The book suggests that the making of these shawls should be done in set aside spaces of Quiet Time, preferably lit by a candle or two, but this wasn't entirely realistic for my rag-bag life which is a constant jumble of work, domesticity and often, sleepless nights when I wake up in the small hours worrying about stuff and so I used whatever time was available, even if some of the spaces were odd minutes here and there to supplement longer set-piece hooky times and I hope that it's not lacking in authenticity thereby. And there is, in a way I think, something good about a project that has accompanied the maker in the to-ings and fro-ings of her life - a different kind of authenticity perhaps from the authenticity of only setting aside exclusive periods of prayerful quiet in which to set about construction, but an authenticity nonetheless.

As the garden images grew in my mind while making this, and as I thought about the lattice pattern, I was reminded of the passage in the Song of Solomon where the young girl spies her lover, peering through the lattice window, eager for her to join him in the garden with all the hope and promise that it contains in the newly-burgeoning Spring.

It epitomises so much what the colours and pattern had made me think of. And as the making of this shawl happens to coincide with what is hopefully the ending of the winter and Spring beginning to arrive, I've called this a "Song of Solomon Shawl". And the writer of the Song of Solomon, (whether Solomon himself or not), puts it much better than I ever can:

"See the winter is past; the rains are over and gone. Flowers appear on the earth; the season of singing has come, the cooing of doves is heard in our land. The fig tree forms its early fruit; the blossoming vines spread their fragrance." Song of Solomon 2:11-13


Hopefully the winter is almost now past and the rains of which there have been so many are indeed over and even if not, I hope that metaphorically my shawl will be a harbinger of Spring in all sorts of ways for my friend across the ocean.

While the Song of Solomon is, on one level, just a love poem, it also expresses very powerfully and profoundly the divine joy in creation and human relationship and the Christian mystic tradition has not been afraid to embrace God as divine lover as opposed to unbending judge. Read 16th C St John of the Cross's poem, "The Dark Night of the Soul" or Medieval Hildegard of Bingen's poetry if you want to see what I mean.

Makes us 21st C types, full of rational sophistication, seem a bit desiccated by comparison sometimes.

I am now on my second shawl for someone I know through work. Different yarn, different pattern but equally revelatory creative experience. Watch this space!

When the idea of making prayer shawls for Lent first took shape in my mind, I worried that appropriate recipients would not be that easy to identify but I needn't have worried, it's been very clear and the only problem will be keeping the production pace up. Thank God for sleepless nights! They may not always be a joy but they have their uses!

Anyone else tempted to have a go at making a shawl to give away? If you are and you'd like to post about it, let me know and I'll put a link to you in my next Lent prayer shawl update.


Blue Heaven's Fading Fire Shawl

$
0
0

My second crocheted prayer shawl for Lent has reached the finish line. It's rather different from the first one although I have still used a variegated, chunky yarn. This one is in Stylecraft Brushstrokes - a mixture of acrylic, wool and mohair in the colourway "Sea Breeze". I love the Stylecraft Brushstrokes range - it is as if the yarn has been painted in watercolours, as the name suggests. Beautifully soft, it has worked up into a beautifully light and fluffy shawl but it was not terribly easy to work with. The fluffiness of the yarn meant that it was almost impossible to unravel, if any mistake occurred, without jamming tight and snagging, like you would not believe, so my initial foray into a pattern with variation and interest had to be rapidly abandoned - too much scope for error that could not be put right. Slightly rattled by the yarn's unravelability, I played safe and chose the first pattern in The Crocheted Prayer Shawl Companion : the "Original Crocheted Prayer Shawl". It is a very simple repeating pattern of single rows of single crochet followed by double rows of double crochet (US terms) using a 7mm hook - so simple even Mrs T with her idiosyncratic, (for which, read "faulty"), counting could not go far wrong! This shawl is a bit wider than my first one - 23" (65 stitches) wide as opposed to 17" but measures the same 60" length, excluding the fringe, so it's quite generous in size.


Initially I felt a bit disappointed that the pattern did not have more interest but in the event the yarn took over and began to sing all by itself as sometimes happens with a project. As the shawl grew, periwinkle horizons began to open up beneath my hook, pale misty vistas and clouded hills, blurred blueness where sea and sky become one, where infinity seems close and where the vastness of creation strikes one with incredulity. There are touches of indigo, like the edges of clouds and some soft chalky green like the tips of distant hills. Despite the reference to the sea in its name, it was the sky that it reminded me of more than anything and in particular this poem by Thomas Merton called "Blue Heaven's Fading Fire".


"Now, in the middle of the limpid evening,
the moon speaks clearly to the hill.
The wheatfields make their simple music,
praise the quiet sky.

And down the road, the way the stars come home,
the cries of children
play on the empty air, a mile or more,
and fall on our deserted hearing,
clear as water.

They say the moon is made of glass,
they say the smiling moon's a bride.
They say they love the orchards and apple trees,
the trees, their innocent sisters, dressed in blossoms,
still wearing, in the blurring dusk,
white dresses from that morning's first communion.

And where blue heaven's fading fire last shines
they name the new come planets
with words that flower
on little voices, light as stems of lilies.

And where blue heaven's fading fire last shines,
reflected in the poplar's ripples,
one little, wakeful bird
sings like a shower."


Thomas Merton, if you haven't come across him, was an extraordinary man. 20th C poet, theologian, Trappist monk, writer, lover of female company in general and, despite his monastic calling, the company of one woman in particular, mystic, perhaps one of the holiest individuals of recent times. Not because he was faultless or saintly, in the sense of being flawless - on the contrary he was deeply flawed in some ways, - but because he somehow distilled his physical, emotional and spiritual humanity to an intensity rather unlike most of what you find in this world.  I love his poetry and his writings and they always lift me to look beyond the mundane and immediate.

It wasn't that Merton was easily holy. It wasn't that he found the way of monastic spirituality he had chosen, easy or even clear always, but he knew who it was he was seeking and he had grasped that silence and stillness and being rooted in the present moment were paths to Him. And for me his greatest gift is the sense that he conveys that if we manage to remain still and silent enough to glimpse "blue heaven's fading fire", somehow, even when we feel lost, we are never alone. And that's a feeling worth cherishing, I think.

Merton communicates the sense that "blue heaven's fading fire" is all around. And I think he's right - it's in the fall of light through a theatre of trees, in wide-winged skies that blur from blue to orange, in the shifting patterns of leaves and water, in the poised presence of a much prayed-in, ancient church, (like the Medieval one where I took my pics above), in the fleeting glance of lovers, in the clutch of a small child's hand on his mother's coat, in the unexpected tenderness of a carer for an aged stranger, in tears that have had to confront the suffering or death of a loved one, in the moment of birth or death, in the sudden joy of just being alive and in unbidden laughter. It is in you and in me and who we are to one another. Throughout his writing Merton is sure of this and longs to share it. "Paradise is all around us and we do not understand. It is wide open. The sword is taken away, but we do not know it." as he wrote in his book, "Conjectures of a Guilty Bystander".

When "the days of trouble come", as Ecclesiastes has it, I find it very difficult not to shorten my focus to what is immediate and pressing but I think it can sometimes help getting through "days of trouble" to hang on to a longer perspective. This shawl is for someone recently diagnosed with cancer, whom I know through my work and who has the long haul of chemotherapy and surgery ahead of her. I hope it may gently and softly remind her of what is beyond the immediate, hard slog of getting through these early days and nights and even if it doesn't say to her all that I have written about here, I hope that it will hold echoes of transparent blue sky mornings and dreamy blue afternoons - past ones, with memories to treasure in the moments when it all seems too much to cope with, and mornings and afternoons to come, in an unclouded future that she and I hope and pray will be hers.


 And I hope that, if nothing else, like Merton's "little wakeful bird", it will softly "sing like a shower" in times of need of that.


I used five 100g balls of the Brushstrokes yarn and had a little left over so what better use to put it to than to make a couple of fluffy pom-poms to decorate the wrapped shawl? Snipping these fluffy pom-poms to shape and snipping the fringe to length was the icing on the cake for Mrs T with her happy snipper tendencies! Had to be so careful not to let them run away with me and reduce pom-poms and fringe to nothing!


Next up, is a prototype shawl of my own design, slightly askew in places so not really up to being given away, but arriving close on its heels, hopefully, with a non-prototype version of the same design that can be given away. Never has Lent been more creative! I am loving it!


Catherine Wheel Shawls

$
0
0
After my little foray into Catherine Wheel stitches with my Fantascot at the beginning of the year, I discovered I'd got a bit addicted to them and, in order to combat the setting-in of withdrawal symptoms, I thought I'd see if I could make a Catherine Wheel shawl as part of my Lent prayer shawl project.


I am pleased to say the experiment was rather successful and a happier Catherine-Wheeler than Mrs T would be hard to find. In fact, I've made two Catherine Wheel shawls. The first was a bit experimental and has a few odd quirks in it so I'm not sure whether it's good enough to give away, but the second is quirk-free and will shortly be on its way to the recipient I made it for.


The quirks are not so much to do with inaccuracies in following the pattern (although they could well be, knowing you, Mrs T!) as in my control-freak attempts to control how the variegated yarn played out. Instead of letting the yarn do its thing, I thought I could do better and force the wheels to correspond in terms of colour by cutting and reattaching the variegated yarn so that the colour pooled as I thought it should do. Bad idea. The making of my first Catherine Wheel shawl taught me I should not be so silly as to think I could play King Canute and turn back the waves of colour. Rather as with life, whatever my secret aspirations and assumptions, it's out of my control and learning to flow with that, rather than fight it, is rather important. But Mrs T is a self-confessed control freak and the lesson is hard learned! In yarn, as in life! Once I'd realised I was on a wild goose chase in trying to control which colours pooled with which and learned to flow with how it came out, it all fell into place. Ut lana varia, sic vita. Read, mark, learn and inwardly digest, Mrs T! I fear it will take me  a lifetime!


But all things considered, it was a joy to make. As was its sibling!


It wasn't enormously easy to find instructions for making Catherine Wheel crochet stitches, as I found when making the Fantascot, although there are several YouYube videos out there which you might want to cast an eye at, if you want to give it a go, but I like clearly written instructions that I can follow at my own pace and carry around with me in a hard copy and these were less easy to come by. Eventually I found a very clear pattern for a bag using the Catherine Wheel stitch pattern here at Manner's Crochet and Craft blog which I adapted and it's worked very well. The pattern is written in US terms and my notes are also in US terms. If you prefer using UK terms remember that single crochet means double, double means treble and half-double means half-treble throughout.

Both my shawls were made with Stylecraft Harlequin chunky 100% acrylic yarn, The first is in the colour-way Cerise / Turquoise and the second in the colour-way Flame / Forest. Both are beautifully evocative of the firework Catherine Wheel, in terms of the way the colours spark and change. To begin with, I was a bit disconcerted at the way the colour could suddenly change in the middle of a row, let alone within a pair of rows, but actually it rather works, I think. And it's a good metaphor for life itself - unpredictable, mixed and inclusive, in a rag-bag way, of the bright and joyous as well as the more muted and sombre.


A few initial notes that you might find helpful before you start Catherine Wheeling yourself, if you want to give it a go. (I would have done anyway!)

1 The Catherine Wheel pattern emerges over four rows and each of those four rows is slightly different at the beginning and the end so it's worth keeping a note on a piece of paper as to which row you are on.

2 Because the pattern repeats over four rows, I found it quite hard to do entirely from memory and it was very useful to have the written instructions always to hand.

3 For the pattern to work as it's meant to, it's important that the number of stitches in each section remains correct so it's important to count, count and keep counting, although once one has got the hang  of it, the counting becomes more or less second nature, even for a faulty counter like Mrs T. And if Mrs T, with her appalling arithmetical abilities can manage it, anyone can! If you find you are out in your count, I am afraid there is nothing for it but to frog back as soon as you realise or the pattern won't flow evenly.

4 The fabric the Catherine Wheel pattern makes is quite dense (and yarn hungry - the pattern would make a great stash-buster for those of you keen to diminish your yarn-mountains! - my shawls used ten and nine 100g skeins respectively) so bear this in mind when you are choosing your yarn and the length of your starting chain. My first Catherine Wheel shawl is quite heavy, possibly a bit too heavy, so I made the second slightly narrower so that the finished shawl was a bit lighter.

5 The sequence of stitches to make the pattern is (a multiple of 10) + 6 for the ends of the rows  so when you are making your starting chain you need to chain (a multiple of 10) + 6 for the ends of the rows + 1 for turning. My first Catherine Wheel shawl began with a starting chain of 77 giving me a total of 76 stitches and my second, slightly narrower, shawl began with a chain of 67 giving me 66 stitches.

6 It's easier to work the first foundational row of the pattern into a row of single crochet rather than the starting chain so I recommend doing a base row of single crochet before you start on the pattern proper. (Go into the second chain from the hook and remember to chain 1 when you finish the row and turn before you start Row 1 of the pattern proper.)

7 The bottom half of the Catherine Wheel stitch itself (which you form in Rows 2 and 4 of the pattern), is really just a series of half-completed double crochet stitches that are finished by putting the yarn over, one final time, and drawing through all the loops on the hook. I found it easiest to do this in two groups of four loops rather than pulling all eight loops off in one go.

8 Catherine Wheel stitches are addictive - you have been warned!


To make a shawl like one of mine, make a starting chain of 77 or 67 (depending on preference) using a larger hook size than the one you will be using for the main part of the shawl. I always do this when beginning blocks of crochet otherwise I find I always chain too tightly and get a curved rather than a straight bottom edge but if you find this isn't a problem with your tension, you may not need to use two sizes of hook. I used a 10mm hook for the chain and switched to a 7mm one for the rest of the shawl. 

I finished the shawls, when they were almost the requisite length of 60"/ 152 cm, by making one more Row 2 from the pattern and then added a row of hdc stitches to give a neat finish. You need to even out the stitches along the row so you end up with the same number you started out with but it's not too critical because it's the last row. I worked one hdc into each sc stitch, three into the first chain space of each wheel, one into the CW spoke and another into the centre and then two into the second chain space of each wheel which gave me the same number of stitches I started with and made a nice, neat, even edge into which to hook the fringe. You can see the final row in the pic below in the soft green colour.


I added a fringe by cutting 12" / 30 cm lengths of yarn. The number of lengths being twice the number of stitches to make the fringe in both ends. I simply folded each strand in half and pulled through each chain / stitch loop with a hook and secured with a simple slip knot. I then misted the fringe, which was slightly curly from being yarn at the end of the skein, with a light spray of water, gave it a light press through a cloth with a medium hot iron and trimmed it with scissors so that the lengths were all even and fall in a lovely silky waterfall from the shawl ends.


Have fun, if you decide to give it a whirl! The fabric the Catherine Wheel stitch makes, would be great not just for a shawl, but for a bag or a cushion cover or anything where you want a textured quite dense fabric. As well as being visually appealing, it's incredibly tactile which I love.


But remember, I did warn you, -

Catherine Wheeling is addictive!

 - just so as you know what you might be getting yourself into!


In My Kitchen In March

$
0
0
Joining in with Celia's In My Kitchen series here, in my kitchen, in March, have been:

eggs - a sudden early Spring glut from the bantams who are now laying for Britain after a bit of sabbatical during the winter. I especially love the speckled shells although I've no idea what makes some shells speckled and others, from the same hens, on the same diet, plain.


and as a result of all the eggs, sponge cake with strawberry and mascarpone filling - very easy and absolutely delicious - tip a pot of homemade strawberry jam and a tub of mascarpone into the food processor and blitz just enough to combine, before sandwiching a pair of sponge cakes together with the resulting dusky pink, strawberry-scented cream. A sturdy spoon and a strong arm would probably do the job without the food processor but Mrs T is lazy and this month is rather short of time. And using the food processor meant that there were scrapings to be gleaned and tested just to make sure the mixture was as good as it looked! (In case you're wondering, it was!)


blood oranges - I adore the colour of these and have been squeezing them for breakfasts most mornings. I don't think their vitamin content is any different from orange oranges but I feel they ought somehow to be more packed with good things on account of their vivid crimson juice;


hot cross buns - I know it's a wee bit early for these but never mind. I am lazy and do not make pastry crosses on mine but simply dip a sharp knife in flour and then make cross-shaped cuts into the buns before baking. Much less fiddle, although you do need to dip the knife into the flour before you make each cut, or it gets stuck! I make my buns according to a variation of Delia Smith's recipe - half wholemeal flour and half white and adding two teaspoons of cinnamon and one of mixed spice as well as a good grating of nutmeg. I only use currants as the dried fruit. I don't know why, especially as of all dried fruit, currants are probably my least favourite - I much prefer sultanas, say, or golden raisins, but in hot cross buns they just feel right, so currants it is!


hooky potholders with daisy-shaped fabric appliqués - Astri got me into making these in her post here and her two previous posts. I really like the combination of crochet and fabric and they are curiously satisfying to make. Partly because they hook up quickly and partly because the fabric appliqués work surprisingly well on the crochet even though you might think they could be tricky to do. I did use Bondaweb to iron the daisies on first before zigzagging round with my sewing machine in case they "walked" but they've slotted into place as thought they were born there. The double layer of crochet combined with the appliqué layers also means they are very ergonomic in function.


 I made them in Puppets 8/8 cotton - like my heart-themed dishcloth  - in assorted colours, on a 4mm hook. The loops are made from off-cuts of homemade bias binding and are stitched in place with a little judicious three-step zig zag stitching before I joined the two crocheted discs together with Astri's neat picot edging. With a little careful hook-work I managed to use the missed stitches in the edging pattern to cover the place where the loops are attached so that the edging runs without interruption, at least on one side. They are washable, cheerful and practical - I love things like this in my kitchen!

homemade shampoo bars curing in my saucepan cupboard, on slatted racks lined with greaseproof paper. The saucepans don't seem to mind and no one has complained that their pasta or soup tastes of the strong aromatic scent of rosemary, lime and euclayptus that currently flavours the shelves! I have been dabbling in soap-making recently and these are my latest creations. I'll post a bit more about making them when they've cured fully and I've seen whether my hair likes them!


Spring flowers sitting in my new little trio of jewel-coloured, glass vases, basking in the sunshine, which through the glass of the window is now perceptibly warm, even though March, so far, has been bitterly cold here.


Have a look at Celia's blog, Fig Jam and Lime Cordial for a glimpse of other kitchens in March!


Cherry Blossom Shawl

$
0
0
The last of my Lent Prayer Shawls is finished and will shortly be on its way.


Like my other Lent Prayer Shawls, it's made with a variegated yarn. This is James Brett Marble Chunky in pink, or rather in colourway, MC30, if you want its official, rather prosaic, name! It's not as variegated as the other yarns I've been using but there is still a clear shading of deep magenta rose to lighter, softer blossom pink. And these nuanced petal shades are what have given the shawl its own particular character.  They reminded me overwhelmingly of clouds of soft, pink cherry blossom and so the shawl became a Cherry Blossom Shawl. I wanted to reflect that in the pattern and so I chose the "Sisters Shawl" pattern from The Crocheted Prayer Shawl Companion where the groupings of single, half double and double crochet stitches make a kind of star-shaped flower pattern in the crochet fabric. 


It's simpler than the Catherine Wheelers and lighter too, which was good because I wanted the shawl to have a lightness about it, like the gossamer blossom it evoked.

I grew up in one of the leafy suburbs of North-West London in a house that was called "Cherry Trees" and when my parents bought the house in February 1971 there were no less than four glorious cherry trees in the front garden. They flowered late, not before the end of April or even early May often, but when they did, the flowers came in great clouds of the palest pink blossom; innumerable, soft, cushiony bunches of flowers; and as a small girl I loved gently to bury my face in them. The trees were quite short ones and by standing on tip-toe on the front step of the porch, I could reach the lower branches fairly easily. Unscented and fragile, yet overwhelmingly beautiful both to the eye and the touch, they were iconic markers of the passing seasons and although, depending on the weather, the blossom might not be there for long, full to the brim with blossom is how I remember the trees, rather than in their more prolonged, leafy, but flowerless, state.

Sadly those four trees are long gone and, for some unknown reason, my parents have never replaced them. Parents often have odd kicks to their gallops, much to the puzzlement of their children! I say that, perfectly sure that H thinks that about me sometimes! But whenever I go home to my parents' house, whether it's May, November or anywhere in between, the cherry blossom floods my memory and my mind's eye and it always will, even though all that remains of the original trees is their stumps, now festooned with rather a lot of ivy.

In Japan, the home of flowering cherry trees par excellence, going to see the cherry blossom is a major event and not purely a superficial or aesthetic one. The activity even has a special name - it's called "hanami". And the word for cherry blossom - "sakura" - does not just stand for the flowers themselves but the reflections of transience and fragility that the flowers evoke. Japanese poets have written haikus and other poetry about them for centuries and they have become icons. Desirable, sublime, exquisitely beautiful yet also fleeting, ephemeral and elusive, like Life itself and the Japanese custom of going to view the cherry blossom each Spring is also an act of Reflection On Life.

There is something both poignant and exquisite about that reflection. We are not here forever, despite the subtle undertow of much in modern society that either tries to avoid recognising our mortality, or deliberately represses it. I have a feeling that this has become the last taboo of the 21st C - one of the things one may not say or talk about much, if at all. Facing the truth however, need not and should not, I think, prevent us from living the time we've got as fully and as delightedly as we can. In fact, I think, the effect of facing it, enhances life rather than the opposite. Although the realisation is tinged with wistfulness, if anything, for me, it sharpens my focus and my depth of vision on what life's about and all it has to offer and be in the present moment.

There's a lovely extract from an interview by Melvyn Bragg with Dennis Potter shortly before he died in 1994 which makes this point exactly. The playwright talks about all sorts of stuff but knowing he has only a few months left to live, inevitably he gets on to living and dying.

"We're the one animal that knows that we're going to die and yet we carry on paying our mortgages, doing our jobs, moving about, behaving as though there's eternity in a sense and we tend to forget that life can only be defined in the present tense.

It is "is"; and it is now only. As much as we would like to call back yesterday and indeed yearn to and ache to sometimes, we can't. It's in us, but we can't actually; it's not there in front of us. And however predictable tomorrow is - unfortunately for most people, most of the time, it's too predictable, they're locked into whatever situation they're locked into ... Even so, no matter how predictable it is, there's the element of the unpredictable of the you don't know. The only thing you know for sure is the present tense, and that nowness becomes so vivid to me now, that in a perverse sort of way, I'm almost serene; I can celebrate life. 

Below my window in Ross, when I'm working in Ross, for example, there at this season, the blossom is out in full, there in the west early. It's a plum tree. It looks like apple blossom, but it's white. And looking at it, instead of saying, "Oh, that's nice blossom, last week looking at it through the window when I'm writing, I see it is the whitest, frothiest, blossomiest blossom that there ever could be and I can see it.

Things are both more trivial than they ever were, and the difference between the trivial and the important doesn't seem to matter - but the nowness of everything is absolutely wondrous."

You can read a full transcript of the interview, if you're interested, here.

Lots of things in life can remind us unexpectedly of our mortality. One doesn't want to dwell on that aspect of them unnecessarily or morbidly but if they make us see the world and ourselves more intensely and vividly, they are strangely precious gifts that may make our lives more alive than ever before.

I wanted to photograph my Cherry Blossom Shawl against one of the flowering cherry trees in my current garden but the appalling Siberian weather the UK has been suffering - three sudden inches of snow here on Sunday last - means that I would have had to wait until Lent was long gone, for any blossom to be out and I wanted to send my shawl off to its recipient. So when looking to nature fell short, I looked to art to fill the void and made my own crocheted cherry blossom.


Using the long tails left over from crocheting them, I tied them to a bunch of hazel twigs brought in from the cold that are now happily surrendering their furry catkins for bright new leaves in the warmth of the house.


A passable imitation for the real thing, at least until the real thing flowers outside!


I searched the Internet for suitable cherry blossom patterns, having drawn a blank in my little (but slowly-growing!) library of crochet books. The pattern I chose is perfect for the effect I was after, although I have to say, it was a tad fiddly to do. It's by Meli Bondre and you can find it here. It makes gloriously puffy, frothy flowers, just like the ones I remember from my childhood home.


And because this shawl had become a Cherry Blossom Shawl in colour and pattern, I couldn't resist adding a few blossoms to one corner of the shawl.


Have I gilded the lily, or rather, the cherry? Possibly I have, but I couldn't resist!


These less puffy blossoms are from the pattern by King Soleil here which makes nice neat flowers that lie flat against the shawl fabric.


If the recipient finds them too much of a good thing, she can always snip them off! But I hope that regardless of this she will enjoy the idea of snuggling herself in a nest of soft pink cherry blossom and that whatever avenue her reflections take her in, this shawl will bring her as much vivid delight as I have had in making it.


I have to confess that I am slightly sad that Lent is drawing to a close. It has been such a creative time and I can only hope that what I have made for others gives them even half as much as making has given me. It's been an extraordinary adventure and one which I relinquish somewhat reluctantly. But all good things come to an end and there are WsIP a-plenty a-calling me, not least my Sea-Ripple, some projects left over from the first half of last year (ahem!) and one or two newer ones as well as some anticipatory summer sewing! So onwards and upwards!


 But secretly, and just between you and me, I am already looking forward to next Lent!

E x

When Spring Won't Spring...

$
0
0
When Spring won't spring, every right-thinking chicken goes broody and retires to a cosy nest box ...


... out of the biting wind and icy garden with a friend or two for company.


This applies to all chickens in the vicinity - real ones and hooky ones! The real ones are sitting on their own eggs, the hooky ones on Cadbury's Creme Eggs. The latter look slightly surprised, as well you might if you'd discovered you'd laid a Cadbury's Creme Egg!


A friend gave me a very sweet knitting pattern for hollow Easter hens in which to hide Easter eggs but although she assured me it was "very simple" I felt it was beyond my very limited knitting powers and sent it instead to my French friend in Toulouse who knits beautifully, regardless of which language the pattern is in, and she made short work of it, within hours of its arriving through the post. So cute was the pic of the result that she emailed me that I felt I must see if I couldn't have a go at a crochet version which I had tracked down here at Delights-Gems. The shaping feels slightly counterintuitive, or so I thought to begin with, but it works perfectly and I've now made several of these little brown hens. I used an aran weight acrylic / wool mix in King Cole Moorland which happens to be the most speckledy-hen-like yarn I could find when I popped into my LYS. Not quite as variegated as my own bantams but passably speckledy!


Having made the hens, however, they looked chilly and egged on (sorry!) by the rapid spread of broodiness among the bantams, I decided a nest was the only way forward.

A hooky nest of course! I'm rather pleased with it and so are they!


It was very straightforward to hook up if you want to make one yourself.

You start off by making a circle of single crochet (US terms) and when it's the right sort of diameter you are after, you stop increasing and just single crochet without increases, on up, until you get the sides the right height. I used Jacquie of Bunny Mummy's lovely and very clear pattern and tutorial for crocheted bowls as a starting point for this and adapted it to suit the needs of my hooky hens.


I used two colours of yarn as per Jacquie's original instructions because it gives the nest enough substance and body so that it stands up properly but instead of changing colours regularly, I used the same two colours throughout - the brown I used for the hens and a green. The green is actually a totally different yarn, it's Forest Green from my beloved collection of Cascade Ultra Pima cotton. Works fine along with the aran weight acrylic / wool mix though, and a 5mm hook made a good tight fabric, without being too difficult to work the double strands of yarn.

I chose quite a dark green because I wanted it to blend with the brown and give a sort of mossy nest appearance. It's worked quite well, I think. To make leaves, growing, as it were, out of the sides of the nest, at intervals along the way, I periodically dropped the brown yarn and made little chain stems of 8 chain stitches out at the sides, just using the green yarn, then slip-stitching, still just in green, down the side of the chain, then picking up the brown yarn again and carrying on with the round using both yarns together. In the round after a round in which I had made stems, I made a 1 ch instead of a sc where I encountered each stem base and in the next round after, I crocheted my sc stitch into the chain loop for those stitches. This helped to turn the little stems outwards nicely. Can't show you a pic because I forgot to take one when the nest was still a WIP.

Once I'd finished the basic nest with a round of slip stitches, I then crocheted leaves onto each little chain stem so that the nest has the appearance of being made from leafy twigs. I crocheted the leaves using the principle of Lucy of Attic 24's leaves on her Happy Flower Decoration but with a slightly different distribution of stitches because I wanted slightly smaller leaves, so my chain stems are a little shorter than in the Happy Flower Decoration. There are twenty one leaves altogether, crocheted on seven little stems in each of three rows, dotted around the sides of the nest at varying intervals.

I used the same colour green yarn for the leaves as the stems but you could use a different green for a varied effect.

And of course I couldn't resist making a few pink blossoms to tuck in among the leaves. These blossoms are my own pattern - more fragile blackthorn blossom than frothy cherry, I think, despite the fact that blackthorn blossom is white, not pink - but any small flower pattern worked on a smallish hook and with thinnish yarn would work fine. Mine are crocheted in two shades of Patons mercerised cotton on a 3 mm hook.


If you don't want to crochet the stems for the leaves as you go, you could always make free-standing leaves and just stitch them in place. Even if you do crochet them integrally with the nest, as you sew in the ends, you may just want to put a small, strategic stitch into the back of each leaf to anchor it against the nest at the jaunty angle you want. That's what I did anyway.

If the hooky hens can be persuaded to stop sitting, the nest will make a nice container for tiny foil-wrapped Easter eggs but at the moment I can't shift them, or only momentarily to be photographed!

When Spring won't spring, unlike the hens, I don't go broody, but I do find myself travelling in two directions at once:

1: I back-track to Winter and make seriously sweet puddings like sticky toffee pudding or syrup tart* with a really deep filling - twice as deep as the recipe says to make it. My version uses 8oz homemade white bread crumbed in the food processor, the juice of a lemon (or may be two) to sharpen the sweetness and a generous slurping of warmed golden syrup - don't ask me how much; this is one of the rare things I measure by eye but by a generous slurping, I do mean pretty generous - the mixture needs to be quite slack and not at all stiff or the result will be tough and not melting. I stir this lot together, pile it into a homemade pastry case,  bake it for 20 minutes in a hot oven and eat it with a spoonful of crème frâiche on the side. You only need a small slice as it is so sweet but it is a very good antidote to lack of sunshine and the bitter cold that currently creeps into every crevice of the house.

* I grew up calling this pudding "syrup tart"; I know many will know it better as "treacle tart". In a way I prefer "treacle tart" - it's more euphonious but my version doesn't actually contain treacle and I like the childhood echoes of "syrup tart" so "syrup tart" it remains.


2: I fast-forward to Summer, dreaming of sunny days to come by beginning to sew a floaty summer dress from this Japanese book:


Hopefully, before long, I will be travelling in just one direction again! And I don't mean the cold one!

In the meantime I think the broody hens have it about right! 


E x


"The Best Laid Plans O' Mice And Men ..."

$
0
0
"The best laid plans o'mice and men gang aft a-gley." You are so right, Robbie Burns!

Mrs Tittlemouse's Easter plans went seriously "a-gley" this year, scuppered by the arrival of a nasty 'flu virus that put paid to all manner of happy, homely activities for all of last week. The simnel cake that was to be baked, never made it; the Easter cheesecake never got eaten when it was supposed to be; chocolate eggs went untouched; Easter cards and gifts were undelivered; visits were unmade and what was supposed to be a week of recreative time away from the pressure of work was spent uncreatively mostly in bed, doing nothing at all. Sic vita.

But this week, life is looking up and over the last few days I have been making up for lost time. Chocolate mini-eggs anyone?


You've all probably had enough of them by now but I haven't and am happily scoffing them ten days late! So if you are mini-egged-out, I'll have yours on your behalf!

Baby simnel cakes, made very late in the day, have taken the place of the big one that was intended. I cut corners by using an easy boil-and-bake fruit cake recipe and retrieving some homemade marzipan out of the freezer, not as easy to roll out and use as freshly-made stuff, but zapped to a passingly malleable softness in the microwave, it served and I am not sure I don't prefer these baby simnel cupcakes to the big one I usually faff about making. The ratio of marzipan and mini-egg to cake is much better in these little ones. It's an ill wind that blows no good as they say.


And while unable to do or think much, all last week, Mrs T's fingers did manage to hook up a little Tunisian crochet cover for the cardboard tub that holds make-up brushes, tubes of sewing machine oil, crochet hooks and other life essentials on my chest of drawers.


The tub, originally a lid for a box containing handcream and redeployed, upside down, is quite squat and was a good shape and size but it had faded in the sunlight and needed a makeover.


A perfect project to do while being stuck in bed as the pattern is very basic and straightforward - just strips of Tunisian crochet in Tunisian simple stitch to line the inside and outside walls of the tub and two discs in the same stitch to cover the inside and outside of the base. Even if I went wrong, it didn't really bother me to unravel and redo it, I was just happy to have something in my hooky fingers. I like Tunisian crochet for this sort of thing - it makes a lovely dense, neat fabric with an appealing basket-work effect.

I made it in plain Casacade Ultra Pima cotton in the beautiful pale blue called "Alaska Sky". I am foolishly influenced by what yarn colours are called and am drawn to some in particular, just because the names they have are either beautiful, or evocative, or both. This is ridiculous, I know, but there it is and "Alaska Sky" does it for me. I am afraid this extends to buying bottles of particular wines because they have nice labels! And conversely I do not shop at a particular supermarket because I find the logo too ugly for words. Illogical, frivolous and shallow - I know!

To revert to hooky matters, the plain cover, even in the beautiful "Alaska Sky" blue, was very plain and needed a little jollying up, so once recovered from the worst of the 'flu, I embarked on making a collection of golden yellow and white Spring daisies to sew onto the sides.


The whole enterprise is perhaps not very practical as it will be difficult to wash with the cardboard tub sealed inside and the happy Spring daisies will probably collect the dust but I love it anyway.


The pattern for the daisies is from the book "Twenty To Make: Crocheted Flowers" by Jan Ollis. They are made using fine No 3 crochet cotton and a tiny 2.5 mm hook. They were rather fiddly to hook up, especially the double-petalled ones, and I was glad when I reached the end of the thirteen that I felt were enough but they do add a lovely Spring touch to my efforts.


The method for making the tub cover is adapted from the pattern in Gina Alton's book, "Pots To Knit And Crochet", which I used last year to cover my kitchen pencil pot. Have a look at my post here if you're interested.

In the meantime and rather belatedly, a very Happy Eastertide to you all!

I must now return to the pile of work awaiting, fuelled by another mini-egg or two, 
OK three, if you insist!


E x


Sparky Grannies

$
0
0
A new hooky book came through my letterbox last weekend and has had me absorbed in every spare moment I've had since.


It's Sue Pinner's new book, "Granny Squares" and it's a cracker.


There are lots of appealing, hooky project-books out there and I find they fall into one of two categories. The first category is books that are visually appealing and make for happy browsing over a cup of tea (or three) and probably contain at least one project that will make it from the page to my hook in due course. The second category is books that are equally visually appealing and also make for happy browsing over a cup of tea (or three) but have more to them. A book in the second category will undoubtedly contain quite a number of projects that will make it from the page to my hook and in addition has the capacity to spark all sorts of avenues of creative thinking, emerging from, but not necessarily contained in the originating pages. "Granny Squares" falls fairly and squarely (sorry!) in this second category. Of the twenty projects it contains, I've counted up well over half that I can see realistically translating into my own hook and yarn activities and in addition it's set my mind in new directions and sparked a number of related but slightly different ideas.

If you follow any of Sue's blogs - she has three! - Suz Place, The 8th Gem and The Flowerbed - you won't be surprised at any of this. Ideas and happy patterns seem to fall off her hook like leaves from the trees in autumn. Granny squares but not necessarily grannies as you know them; Sparky Grannies - grannies that might or might not be squares; grannies with four sides, six sides or eight; grannies with attitude; grannies with style; grannies that become flowers and stars and anything else in between as well as patterns that aren't grannies at all!

A couple of Sue's octagon "grannies" just made to see how they turned out!
I've been wondering what it is that makes a book fall into the second rather than the first of my two categories and I think part of it is the usefulness or lack of usefulness of the projects. Generally, I like to make things that, however decorative, do have at least a partially useful function as well. Not always, but often. Sue's projects are all useful as well as decorative and actually it's her ideas about innovative uses to which crochet can be put that give the book the sparkiness that sets alight the tinder of other ideas and possibilities beyond the book itself.

I've seen crocheted lampshades in blogland and elsewhere but never a bath mat, nor a deck chair cover, I've seen pillow-slips with crocheted edging but not a completely crocheted pillow-slip for a pillow to sit up in bed against, when reading or hooking - a clever twist on the simple idea of a cushion-cover but not one I'd thought of.


Whether a book falls into the second category or not is also something, I think, to do with the clarity and flexibility of the pattern instructions. Directions for a motif, used in one way, suggesting somehow all manner of other ways in which it could be used. The same thing is true of colours and yarns - the way they are written about or photographed, sometimes seems as full of creative potential as of actual creative history, while sometimes it doesn't.

Of the projects in "Granny Squares" it was the bath mat that grabbed me first. Why didn't I think of this before? It's a perfect crochet project - essentially straightforward, not too big, ambitious, or expensive, an open canvas for playing with colour and pattern, either in blocks or in a continuous piece, a fantastic way to use up oddments of cotton yarn and useful to boot. What household does not need another bath mat? The book's tantalising hexagon design sent me straight to my multi-coloured stash of Rico Creative Cotton, left over from blankets past.


And armed with a 4.5 mm hook, a little carpet of hexagons has crept forth this week in jolly Spring-like colours.


The hexagons have a lovely daisy-shaped flower in the centre, the perfected shape of which only emerges as you hook up the final edging round. I can't tell you how addictive I find it to watch the petals emerge, defined and flowery under my hook, in that final round!

The end of round two. The petals are made but you can't see them properly yet.

Here they are emerging, as the final edging round is made, separating and defining each one.

One finished Hexagon daisy with all her petals showing!
Seeing these appear, my best friend commented that some in softer, more muted shades would be lovely too. Nothing loth, and because I have been flirting recently with the idea of grey as a neutral to set off other colours, I tried some with soft-coloured flower centres and grey edging.


Not sure I liked them to begin with but as one grey-edged hexagon became two and then three and then four etc, love blossomed! Not sure now which I prefer, the vivid brights or the muted pastels-and-grey!

A third bath mat, would you believe, is also in production because Sue's suggestion made me recall the sampler squares I started making last year from the Better Homes And Gardens Knitting and Crochet book's pattern for a "Granny Square Sampler Afghan". These too were made from my stash of Rico Creative Cotton and were intended to make a picnic blanket. The idea stalled, principally because the squares were so darned complicated to hook and the instructions so tricksy to follow that I couldn't face making enough squares for a whole blanket and partly, of course, the weather last summer was so unconducive to picnics as to water down the incentive anyway. But brought out from the basket where they had slept undisturbed for almost a year, and set out on an existing bath mat, I realised that they were only a square or two away from a new destiny.


Some of the smaller squares need another round or two of edging to make all the squares the same size  and we will be in business! And it doesn't matter what the British summer does - my bath mat will be used whether it rains all summer again or not!

After the bath mats, I have my eye on the hooky pillowcase and then perhaps the kitchen stool cover but who knows what else will get sparked off in the meantime?


Happy Hooking of Sparky Grannies!

E x


The "We Have All The Time In The World" Blouse

$
0
0
Although my childhood was largely in the 1970s I wouldn't exactly describe myself as a Sixties / Seventies flower-child. I lacked the requisite length of hair for a start, in which to insert a strategic flower, when an appropriate opportunity presented itself, and to wear loose and long, like Françoise Hardy or Carly Simon. My mother, for some unknown reason, didn't approve of jeans and we were never allowed any as children so I never wore frayed bell-bottoms, topped with a cheesecloth blouse, with puffy sleeves and broderie anglaise lace panels.


Bare feet were also a no-no for wandering about in and flip-flops were regarded as "silly and dangerous" - "no proper support for the feet and liable to cause you to trip", according to my mother. I can't tell you how much I longed for a pair of plastic, flowery flip-flops, aged nine or ten, but there was nothing doing! My mother much preferred to spend her money on sensible sandals for my sister and myself, to be worn with ankle socks. I have taken against ankle socks ever since.

One summer I was so desperate for the forbidden flip-flop that, while my mother's back was conveniently turned, I cut up a pair of old slippers (my childhood "happy snipper" tendencies clearly to the fore again!) and glued a strap made out of an old mackintosh belt in place, to produce a makeshift homemade pair. I thought they were marvellous and click-clacked around the garden all day in them until the glue gave way and my glamorous flip-flops were no more!

Perhaps because all this left an element of unfulfilled longing for the accoutrements of hippiness, as an adult, I have indulged my longing for some of these things, certainly for flip-flops and longer hair, although I never wear it loose because of its deeply regrettable tendency to curl on me. I have been known to stick the odd flower in it, however, and I like to walk barefoot. I live whenever possible in jeans and more recently I have discovered in myself a longing for a flower-child-blouse with hippy notes to it. Not cheesecloth, but not far off it and with the requisite broderie anglaise lace trimming.

I actually completed most of it about six months ago but then, over the winter, it lingered, unfinished, with the odd pin dropping out of it periodically while it drooped slightly sadly, on a hanger, on the back of a door. With the arrival of Spring and sun in the last few days, I suddenly had an imperative urge to finish it and here it is.


It's a genuine vintage pattern from the late Seventies, or early Eighties perhaps - McCalls 4031


(found on Ebay in the course of a flower-child-blouse-hunt) - which I chopped up to create patchwork panels out of three odd half metres of fabric I'd bought in a mix-and-match set of prints just because I loved them.


Not enough to make the whole blouse on their own, I added a metre of a contrasting dark blue print to eke them out. The bottom hem is edged with some genuine seventies lace hoarded in my sewing basket since I was about ten - does this make it genuine vintage lace? I think it might, if not antique!


There wasn't quite enough to edge the entire hem as well as fill in the gap below the neckline which I had inadvertently slashed too far. (Eek! Why don't you read the instructions more carefully, Mrs T?!) But I managed to stretch it with a small amount of a different (also vintage 1970s) lace, inserted unobtrusively at the side of the hem where it doesn't show very much.

I've called it after Louis Armstrong's famous number "We Have All The Time In The World". We don't have all the time in the world, of course; as James Bond and his girl didn't at the end of "On Her Majesty's Secret Service", where the song made its 1969 début, but it reminds me that sometimes "having time" is not about having unlimited hours but about choosing it and revelling in it for the moments it lasts and wearing this blouse in the sudden April sunshine makes me feel that.


I know it's just a bit of clothing but sometimes wearing something that speaks strongly to oneself can make a big difference to how one feels and this does it for me. It's a little bit hippyish and flower-child-like and gives me the feeling, possibly illusory I grant you, of time spent, without one eye on the clock, and dreamily drifting, barefoot (or flip-flopped, of course!), among flowers and by still waters with time just to be.


You can subject any straightforward shirt pattern to the chop-and-patchwork principle - just remember that each time you cut a section, you need to add on an additional seam allowance to both sides of the cut pattern pieces. A pattern using essentially simple linear shapes is easiest and personally I'd eschew anything cut on the bias to divvy up in this way but it's a fantastic way to use bits of fabric you love, even if you haven't got enough of any one fabric to make a whole garment. It's also a good way to use a fabric that is too expensive to buy in large quantity, but affordable when in small amounts and mixed with other cheaper fabric.

A couple of further tips if you think you might give something similar a go. Think about how the panels will work together when made up, when you choose where to place your fabrics, ie don't cut your best showcase fabric into panels that will end up hidden round the back of the garment and don't make the patches too small or it will become very fiddly and also fabric-hungry because of all the extra seam allowances.

Might chop up a skirt pattern next and acquire some cheesecloth! 

Crochet Bath Mat # 1

$
0
0
My little crochet bath mat production line has been busy and Bath Mat # 1 is ready to roll out and receive any wet feet coming its way! I love it!


And what I particularly love is the fact that it has turned so happily into this, instead of the Granny Square Sampler Afghan, which the squares were originally intended for. Sadly abandoned last summer, because I found the pattern just too complicated to keep going with, they lay dormant, useless and nearly forgotten for almost a whole year. But their time has come and I am so glad I couldn't bring myself to unravel them when I realised the blanket idea had stalled last autumn.


Note to self: Stay the unravelling hand of care until time has hooked it up again! No, that's not quite right but you get the gist!

The lovely thing about this use for such squares is that it raises all manner of possibilities for similar patchwork mats. You could use new patterns for blocks you fancy experimenting with, brush up your hooky skills and make a skill-challenging combination of different blocks - some of my squares, notably the ones with stars and circles in them, certainly challenged my skills - or you could use the simplest Granny Square scheme in varying colours and rustle a whole mat up without a pattern in sight.


For a bath mat, cotton yarn is perfect - washable, soft and absorbent. The bath mats in Sue's book are made using a mixture of cotton and acrylic yarn which obviously also works fine. But acrylic on its own would not be absorbent enough, I think, and I am not sure about wool for a bath mat. I used a 4.5mm hook and Rico Creative Cotton for this, which I really like, although the Creative Cotton can be a little bit splitty on the hook, if you aren't careful. But it's a good weight (Aran), it's cheap and the colours are so bright and cheerful. Some of the colours I've used, which were in my post-blanket stash, have now been discontinued, which is a shame, but it's a fantastic way of using up lots of ends of skeins - you don't need much of any particular colour apart from in the border.


The mat did need a border, I felt, once I had sewn the squares together. Something just to hold the squares together, visually and literally. I added five rows of single crochet in different colours to make a simple but satisfying edge and it gives the mat a nice cohesion, I think.

If you prefer, you can of course use the join-as-you-go method to join the squares but I like to play around with the design once all the component parts are completed so sewing them suits me better and I actually find it easier.

In the above pic, the water looks almost jacuzzi-esque. This is not because I have a jacuzzi but because H who put his head round the door to offer creative photographic advice told me it was no good taking photographs of a bath mat without water in the bath. After I had precariously balanced across said bath, now filled with cold water, to repair the omission, my critic felt that the still water was not definite enough in the resulting images and churned the surface vigorously, instructing me when to press the shutter and the pic above is the result! The bath mat remained dry, although that cannot be said of all in the vicinity!!

Another note to self: If perching across a filled bath to take photographs, make sure the water is warm, not cold, or wear a wet suit!

The bath mat is not a geometric rectangle as you can see! Something a bit "wee-wowy" has happened at the corners!


But I like the slightly quirky corners, which come, I suspect, from putting together squares that are not absolutely identical in size or may be my border edging was a bit creative in places, I'm not sure! I did my best to add a round or two here or there to the smaller squares to achieve compatibility, but the original afghan design was meant to come out a bit asymmetrical so perhaps it was never going to be perfect. If you prefer a more geometrically perfect rectangle on which to plant your post-bath or post-shower feet, it would probably make sense to choose patterns for blocks that promise identical measurements.

Bath Mat # 2 is nearly finished too. My little carpet of hexagons has grown nicely and they just need sewing together now. A job for a happy half hour in the Spring sun perhaps!


Jeans For The Golden Road To Samarkand

$
0
0

Do you know that poem by James Elroy Flecker called "The Golden Road to Samarkand"? Actually Flecker wrote two similar poems. One is called "The Golden Journey To Samarkand" and is a reflection on the equalisation of achievements that the passing of time imparts - a theme rather akin to Percy Bysshe Shelley's "Ozymandias"-, the other is a set of dramatised verses, called (confusingly similarly), "The Golden Road to Samarkand". The quotations from Flecker's poems that I've used here are all from "The Golden Road to Samarkand" except where otherwise indicated.

The verses in the second poem are intended to be spoken by different voices, as it were from a caravan, about to set out from Baghdad (I think), along the historic Silk Route, to the ancient city of Samarkand, situated in what is now Uzbekhistan. It is a beautifully evocative piece of writing that conjures up all the exotic, mysteriousness of the East and the draw that it has exerted on travellers from further west, from time immemorial. Its also echoes ancient human restlessness and the primeval desire to travel beyond the familiar and known.

Each group of merchants has a verse that describes what they have stowed away on the camels who "sniff the evening and are glad" as they wait to "leave ... the dim-moon city of delight"

(The Chief Draper)
"Have me not Indian carpets dark as wine,
turbans and sashes, gowns and bows and veils,
and broideries of intricate design?
And printed hangings in enormous bales?

(The Chief Grocer)
We have rose-candy, we have spikenard,
mastic, and terebinth and oil and spice,
and such sweet jams meticulously jarred
as God's own Prophet eats in Paradise.

(The Principal Jews)
And we have manuscripts in peacock styles
by Ali of Damascus; we have swords
engraved with storks and apes and crocodiles,
and heavy beaten necklaces for lords."

I love writing like this that conjures up vivid pictures, colours and scents with every tactile word. I know you can't normally call words "tactile" but I think some are. Something more than onomatopoeic. When I read those verses, I can feel the powdery sugar, drifting lightly from the "rose-candy"; I can smell the strong, poignant perfume of the "spikenard" and the resiny, aromatic scent of the "terebinth"; I can see the colours of the "meticulously jarred" exotic preserves, glowing through glass like coloured jewels; I can feel the deep velvet pile of the Indian carpets; the thickly decorated "broideries" are real to my imagination; the contours of the different stitches, the smoothness of the silk on which they play, are as vivid to me as my own more mundane clothing; the exquisite, illuminated manuscripts of eastern stories and Arabic science dance before my eyes and the cool, chased metals with their "storks and apes and crocodiles" intrigue my fingers as well as my mind somehow. Fanciful? Possibly! Wonderful? Definitely!

And as well as the merchants who make up the bulk of the caravan with their exotic wares, are pilgrims whose motive is not commerce but the wanderlust of the soul.

(Pilgrims)
"We are the pilgrims, master; we shall go
always a little further; it may be
beyond that last blue mountain barred with snow
across that angry or that glimmering sea,

white on a throne or guarded in a cave
there lies a prophet who can understand
why men were born; but surely we are brave,
who take the Golden Road to Samarkand.
...
Sweet to ride forth at evening from the wells
when shadows pass gigantic on the sand,
and softly through the silence beat the bells
along the Golden Road to Samarkand.

We travel not for trafficking alone;
by hotter winds our fiery hearts are fanned:
for lust of knowing what should not be known,
we take the Golden Road to Samarkand."

OK, you may be thinking, but what has this got to do with a pair of jeans? It started with a book. Not a poetry book, but a hooky book - "Crochet Garden" by Suzann Thompson. If you like crocheting flowers, this book and its companion volume, "Crochet Bouquet", are joyful and worthwhile additions to your hooky bookshelf.

Browsing through "Crochet Garden" I came upon a pattern for a "Samarkand Sunflower", inspired by textiles and pottery produced in ancient Samarkand. The name reminded me of the poem and suddenly a little hooky project was born.

One of those projects that just happen sometimes when a handful of ideas coalesce and just have to be realised without delay.

One of the project suggestions in "Crochet Bouquet", is to add some crochet "Crazy Eight" flowers to a pair of jeans.

Change up the "Crazy Eight" flowers to "Samarkand Sunflowers", add a handful or two of silver bells and you have a pair of jeans in which to join a camel-drawn caravan in "marvellous tales of ships and stars and isles where good men rest, where nevermore the rose of sunset pales, and winds and shadows fall towards the West" (from "The Golden Journey to Samarkand")

And that is exactly what I did. I began by creating large Samarkand Sunflowers in gorgeous vivid shades of pink, gold, jade and turquoise.


But when I pinned them onto the pair of jeans I had lined up for this project, the effect was, shall we say, rather startling and, I felt, wisdom regretfully suggested toning down my palette for the flowers a bit. If I were twenty years younger the bright colours would have won through... "Eheu fugaces, Postume, Postume, labuntur anni..." Anyway, never mind the slipping years, Postumus; in a more subdued palette of pale blues, lavender, taupe and muted violet the effect is absolutely wearable. I feel, anyway!

See what you think!


I added a tiny silver bell to the centre of each flower


And then, (because less is not always more!), I added a handful of extra bells to the top of each pocket edge in the front.


All that remains to accompany wearing the result, is to make some mint tea from my newly-burgeoning Moroccan mint, to be sipped from glasses, resting on the discarded original flowers that have now become Samarkand Sunflower coasters, and rustle up some rose-scented Turkish Delight.


I don't normally like Turkish Delight much, I have to say, but I am so caught up in my imagination with the "rose-candy" of the poem that I've made some*, and am eating it and dreaming of imagined exploration and adventures not yet known.

"Open the gate, O watchman of the night!
...
We take the Golden Road to Samarkand!"

If you fancy giving this idea a go yourself, it's quick, cheap and very easy. A good Bank Holiday Weekend project perhaps! All you need is:

- a pair of old, comfortable jeans, all the better if softened through much washing and a bit faded and frayed at the edges, or with a trendy rip or two - matters not - these are jeans for wearing and living and travelling in not for hanging up pristine in a corner somewhere.
- some washable yarn in assorted colours to suit your fancy - I used Cascade Ultra Pima cotton from my stash but anything that won't shrink when you wash the jeans will be fine.
- a hook to match the weight of the yarn - I used a 4mm one with the Cascade Ultra Pima
- a pattern for a hooky flower, preferably one that lies flat and you can make up in a couple of sizes for variety's sake. Doesn't matter if you haven't got a book of hooky flower patterns - there are lots of suitable flower patterns on the Internet. Have a trawl and pick one you like and which will suit your skills.
- tiny sew-on bells - I got my silver ones from here (£1.20 for 25 bells and very quick delivery, in case you are interested)
- a needle and sewing thread in colours to match the outer edges of your flowers

What you do:
- hook up a number of flowers - as many or as few as you like.
- pin them onto the jeans wherever you feel they would work best. Try the jeans on to check the effect.
- stitch the flowers securely in place by hand all round the outer edge of each one with the sewing thread, using small stitches and keeping the thread as invisible as possible - the crochet is very forgiving and hides the stitches well but you want to try and avoid "cats' teeth" stitches showing on the denim. If you are attaching flowers to the pockets, be careful not to stitch through all the layers of fabric or you will no longer be able to use the pockets! Guess who found that out the hard way?!


- stitch little bells in the centre of the flowers and / or wherever you like. Not on the back pockets though or "The Princess And The Pea" will have nothing on you!


- put your jeans on, "leave you the dim-moon city" and "take the Golden Road to Samarkand"! Even if in reality, the road you take is less exotic than the caravan's and more prosaic, like mine: the school run, piling through a mound of paper-work, or getting the laundry out!


*My "rose-candy" is delicious but was quite a fiddle to make (and the less said about the state of the kitchen and my saucepan afterwards, the better!) I used a Good Housekeeping recipe without gelatine, as apparently authentic Turkish Delight should not contain gelatine - I think it's properly made with mastic (as itemised in the poem) which is a kind of eastern gum. You can buy it in Greece but I've never tried a recipe with it and you can't get it easily in the UK.

The Good Housekeeping alternative used cornflour and tartaric acid (I used cream of tartar, which is not quite the same but is a derivative compound of tartaric acid - use double the quantity of cream of tartar, if substituting, for that given for tartaric acid). You boil this little lot up at length in a sugar syrup, until the starch molecules change their nature to make a wonderful, translucent jelly, and then add a spoonful of honey, some rosewater and a drop of orange oil. It tastes, as I say, very good, surprisingly good actually, and has gone down an unexpected storm with the rest of the household, but the clearing up afterwards was something else! So if you fancy a mouthful of "rose-candy" to accompany your Samarkand jeans, you might prefer to buy some rather than make it!

The peppermint tea, by contrast, is as simple as stuffing a handful of fresh Moroccan mint leaves in a tea pot, adding boiling water, leaving it for five minutes to brew and pouring into an eastern tea glass. I like it unsweetened but more authentically, I think you should add sugar. Beats any commercial peppermint tea, hands down!
E x

"Easy Summer Living" Bags

$
0
0

I have been having a bit of a clear out of my fabric stash - basically because the lids on my boxes wouldn't close and in fact are beginning, literally, to crack up under the strain! I am a bit of a hoarder of printed fabric and tend to buy bits of this or that, when I can afford it, just because, well, you never know, and if I don't buy them when I spot them and go back subsequently, having decided I must acquire whatever print it is that has caught my eye, nine times out of ten, it's gone with the wind and any inquiry about it, is a cue for hearing those depressing words, "No, we won't be getting any more in.".

The good news about this hoarding habit is that there is usually something to draw on for a particular project (so long as not too much of any one fabric is needed); the bad news is that there's quite a lot of fabric that sits around not being used because its destiny hasn't (yet) come up! So I have been thinning it out a bit, with some happy results, I have to say.

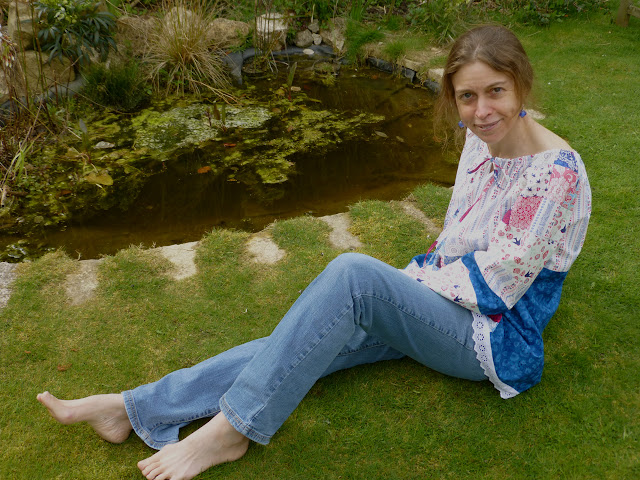
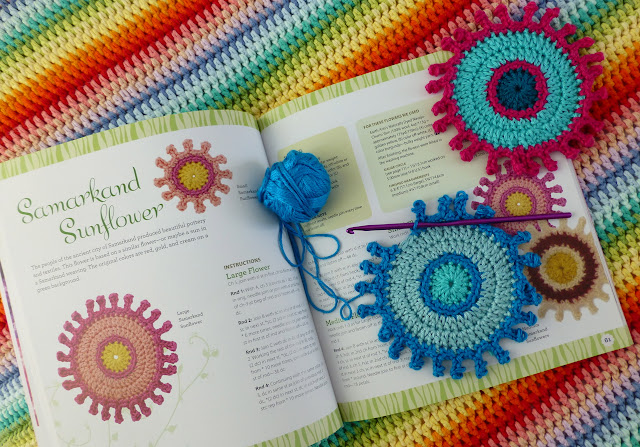
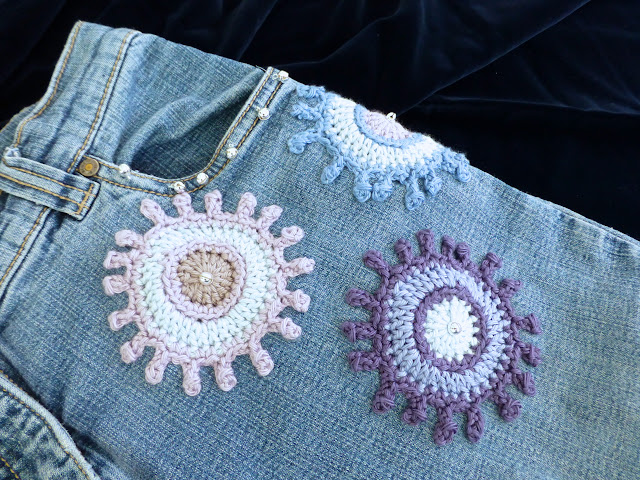
My first foray into "thinning out", married some fabric from my stash with some fabulous prints which a dear friend in Tennessee sent me. The result of this is, although I say it myself, a rather gorgeous gipsy skirt, which is nearly, but not quite, finished. I'll show you when it is - clearly 2013 is the year when my hippy tendencies are emerging Big Time because my gipsy skirt has a beautifully vintage 1970s vibe about it, to join my other recent makes of my All The Time In The World Blouse and my Jeans For The Golden Road To Samarkand.

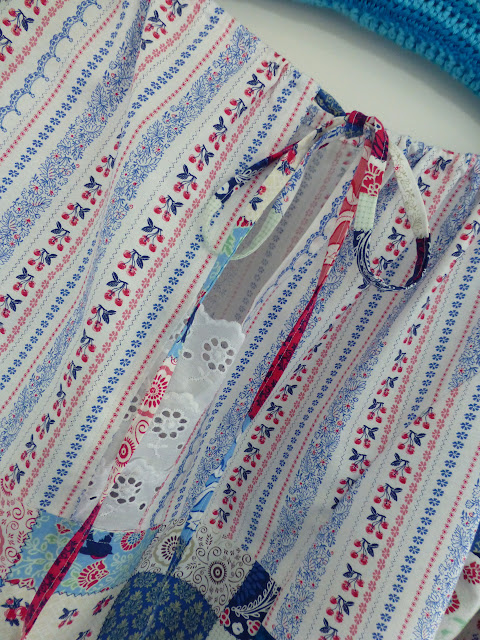
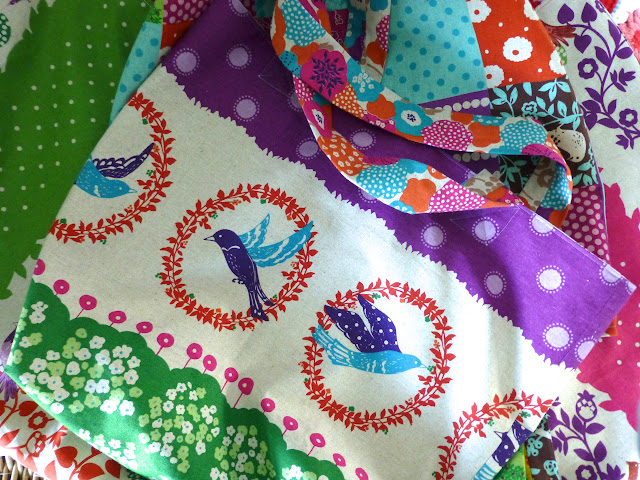
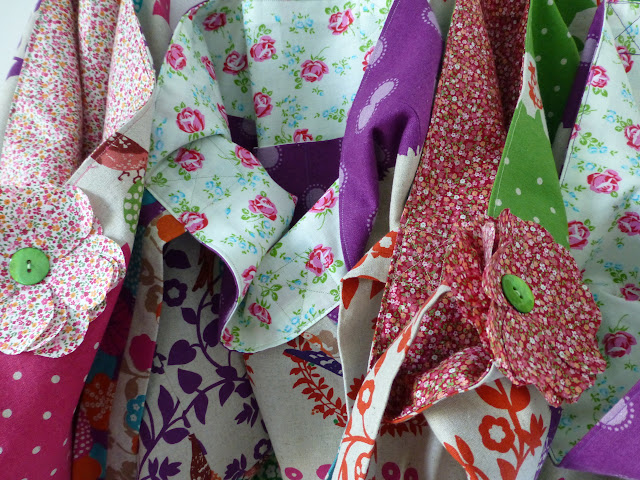
My second "thinning out" has resulted in some straightforward, but nonetheless pleasing, bags using some leftover Japanese Kokka Echino print fabric for the outsides and assorted flowery prints for the linings - mostly some Tanya Whelan Sugar Hill "Scattered Roses" in pale lemon, pink and green with a touch of light blue and some John Louden "English Florals" in mixed reds, pinks, greens and oranges.


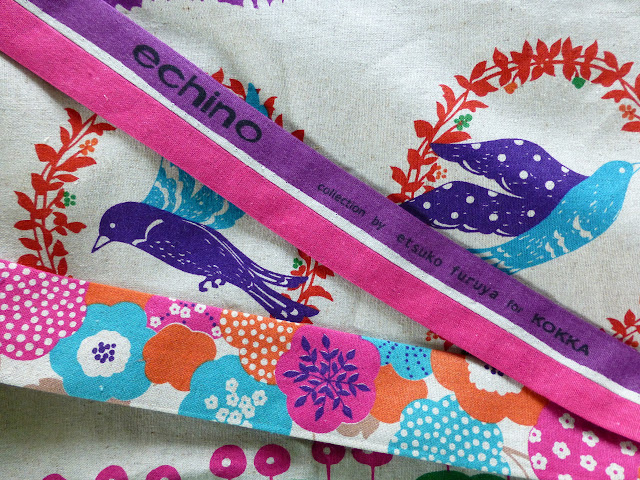
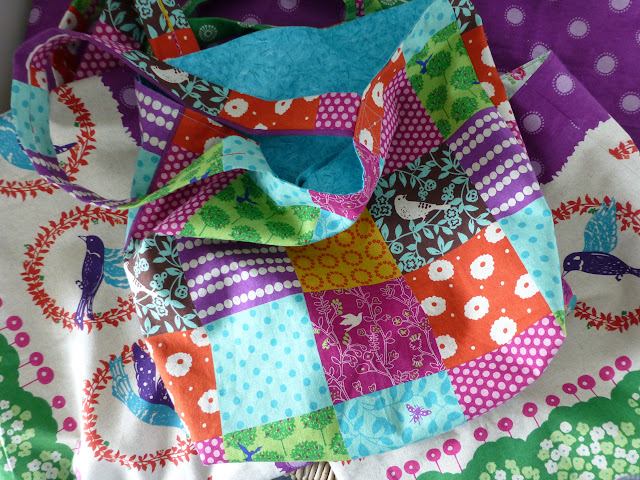
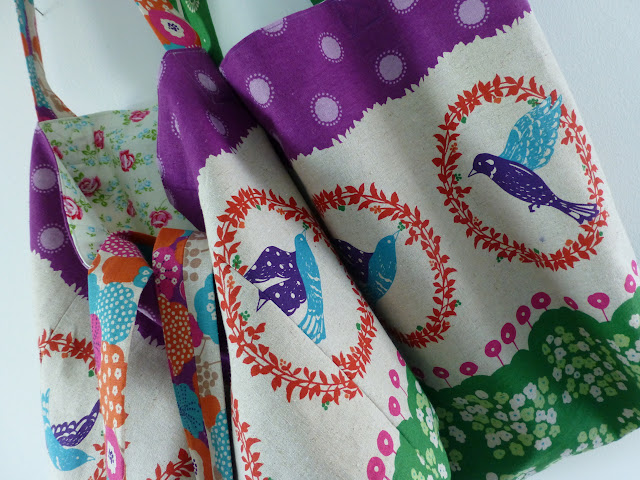
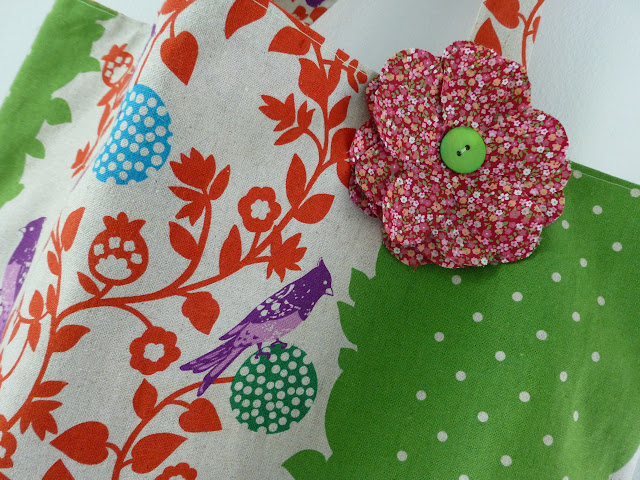
Bags like these are very easy to make and I find them very useful. The Japanese Kokka Echino print fabric is perfect for bag-making because it's a lovely linen / cotton mix which is a bit heavier than plain cotton and so is nice and robust, while still pretty. I love the colours - those bright greens, violets, pinks and oranges mixed with slightly milky turquoise against the natural linen-coloured background are very summery and the woodcut-effect birds and flowers have a lightness and energy to them that is very appealing.

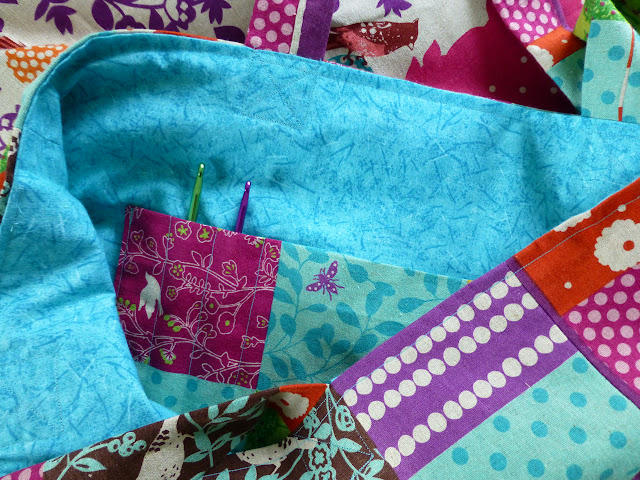
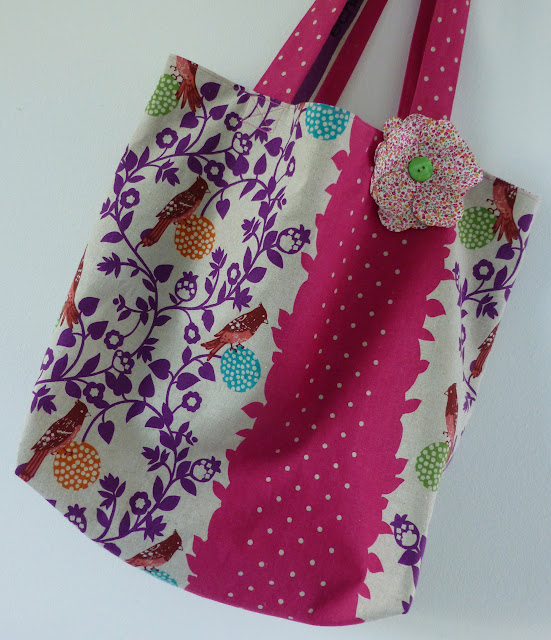
My design is for a biggish bag, but not too big, the finished measurements are about 17" by 16" / 45cm by 40cm, so almost, but not quite, square, with a nice boxy bottom and a useful inside pocket with compartments for the essentials of life - crochet hooks, tea bags, scissors, 'phone, car keys etc.


I find this sort of size of bag particularly useful in the unpredictable and flighty English summer. Big enough to carry a spare cardigan for when that blissfully clear, summer day suddenly turns cloudy and a sharp little breeze takes the edge off sitting dreamily outside in the sun; accommodating enough to store the same cardigan when another grey, rather damp day suddenly lifts, the sun springs out and a layer or two needs to be shed with immediate effect; robust enough to house an impromptu picnic, a portable hooky project, a bundle of work papers and several heavy bunches of large keys; light enough not to be cumbersome when I'm walking cross-country; capacious enough to take a spare pair of flip-flops for when I'm not walking cross-country; flexible enough to shove under a chair, in the boot of my car, on the kitchen work-surface; and as well as all the above, user-friendly enough to go happily in and out of the washing machine when my bar of chocolate melts at the bottom of it, my flask of tea spills in it or my fountain pen leaks on it.

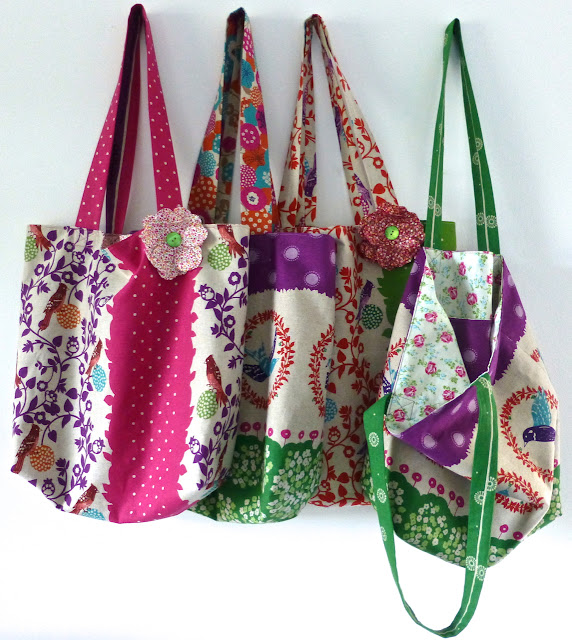
This is a bag for easy summer living and I've made five in total.


One is a present for a friend, one I am already using, (hot off the sewing machine!), and three are looking for happy homes. Anyone interested? If you are, leave me a comment and, (if there are more than three of you), I'll draw names out of a hat at the end of the week.


I'll send anywhere in the world so long as you are happy to email me your postal address and can give a bag a happy home, even if you live somewhere where the summer is less fickle than here in the UK! These are not factory-perfect bags - they have the odd little quirkiness that goes with "handmade, homemade" but I hope some of you might enjoy using them. See what you think from the pics.

Or of course you might prefer to make your own version with your own choice of fabrics rather than mine. If so, here's my design and a few instructions to help you along the way should you need it. You need about a yard / a metre of fabric for the outside and the same again for the lining but don't forget you can always piece smaller bits together to make a lining, if you have some small left-overs from another sewing project. No one will see on the inside. The same thing applies to the straps if you are short of fabric.

The bag itself is a doddle to sew but it's worth taking time over drawing out the pattern to get a good finish. The pattern I drew up is this one below and it includes standard 5/8" / 1.5cm seam allowances so you don't need to worry about adding these on to the measurements I've given here. I tend to work in inches when sewing, I am afraid, but I've given the metric equivalents for those of you who prefer that.


I originally wanted to scan the pattern I drew out by hand, but my printer decided it wouldn't cooperate so I've had to draw this out on the computer which was trickier than I thought, not least the insertion into the blog post via a screen shot which was the only way I could make it stay where it was put! It's not to scale as you can see, but it does make clear what you need, I hope!

The square cut-outs in the corners aren't essential but take the guesswork out of achieving a nice neat boxy bottom for your bag so I think it's worth drawing them and cutting them like this.

It doesn't matter where you place the notches on the bag sides but the notches on the boxy cut-outs in the corners should be placed exactly half-way along each indentation, as shown, to work properly.

Once you've drawn out your pattern pieces on some scrap paper - a bright felt pen and some newspaper do nicely - let's get cutting! (Happy Snippers Of The World Unite! Tee hee!)

You need to cut four pieces of the main bag pattern piece, two in your outer fabric and two in your lining fabric. In addition, cut two pieces of the pocket pattern piece, one in your outer fabric and one in your lining fabric. You also need to cut two straps, one for each bag side. Mine started off as two strips of fabric 28" / 71cm long by about 4.5" / 12cm wide but you can make them shorter and a bit narrower if you want. Don't make them too narrow or they will drive you mad when you come to turn them out!

OK? Now you're ready to sew, so crank up your sewing machine with some thread to match or tone with your fabrics and, while you are at it, switch the iron on, so that it will be good and hot, when you come to press the seams you're about to sew.

Take your two pocket pieces and pin them together, matching the edges and with right sides facing. Stitch along each of the four sides leaving a gap for turning in the bottom long edge. Clip off the corners of the seam allowances and turn the right way out using a wooden knitting needle or similar gently to poke out the corners. Press.

Now line the pocket piece up on the right side of one of your lining pieces it should sit about 4.5" / 10cm below the top edge and central between the two side edges. Pin in place and then top stitch along the sides and bottom edge, (not along the top obviously, or it will be a patch not a pocket!) You can now make little compartments in your pockets if you want to - I made some for crochet hooks on-the-go and a couple of slightly larger ones for other stuff. Just draw the lines where you want the divisions to come on the pocket, with tailor's chalk and a ruler, or mark with pins, then topstitch through the pocket and lining fabric, to make compartments to suit your particular needs. Pull through any threads to the wrong side of the lining piece and knot neatly to secure.

Place the outer fabric pieces of the bag together, right sides together, matching edges and side notches. Don't worry about the corners at this stage. Pin along the sides and the bottom edge, leaving the corners flapping gappily! Stitch. Do exactly the same with the lining pieces.

Press each of the sewn seams flat and open.

Fold the right side of the fabric towards the wrong side in a 5/8"/1.5 cm seam allowance along the top edge of the lining and the outer bag. Press.

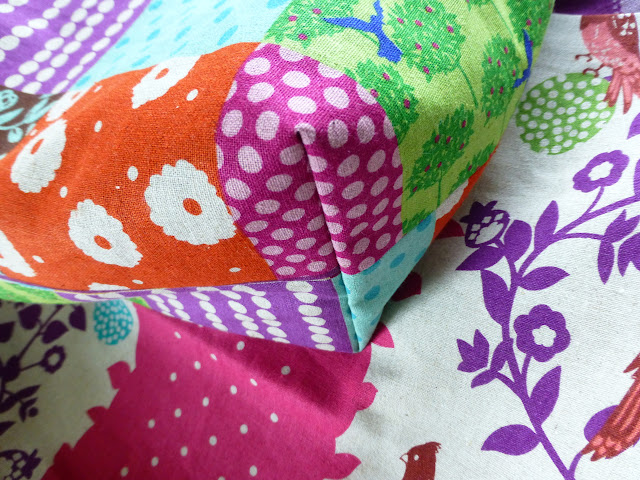
Now for those boxy corners. What you want to do is to match up the notches in a neat line across the bottom of the bag / lining, aligning the opened out and pressed ends of the side seams with those of the bottom seam. This is much easier to demonstrate than to write instructions for! Your little notches should match in pairs as in my pic. Pin and then stitch across.


See?! You've now got a lovely squared-off boxy bottom!


Nearly there now! Insert the lining into the outer bag with the wrong sides of the fabric facing one another. Pin the top edge of the lining and the bag together but don't sew yet because we're going to sandwich the strap ends between the layers.

OK, time for the straps. Take your strips of fabric and and fold each one lengthways, right sides together and stitch with a 1/4" / 0.5cm seam allowance. Press the seam flat with the wrong side of the fabric still facing outwards as in the pic below. (Pressing them first, the wrong way out, makes it easier to get a neat finish in the turned out straps.)


Now for the tricky task of turning the straps the right way out. Be patient with this - they will come out but it's fiddly and takes a little time. A wooden knitting needle, judiciously applied can help but go gently, you don't want to pierce the fabric (or jam it into an impenetrable knot, as Mrs T tends to, when she gets  impatient!) Gentle and patient teasing out is the answer. Once you've got the straps turned out, press them again and insert the ends between the lining and the outer fabric of the bag about 4.5" / 12cm from each side seam and with about 5-6" / 13-15cm between each pair of handles. Each end should be inserted about 1.5" / 4cm below the top edge. Pin securely.

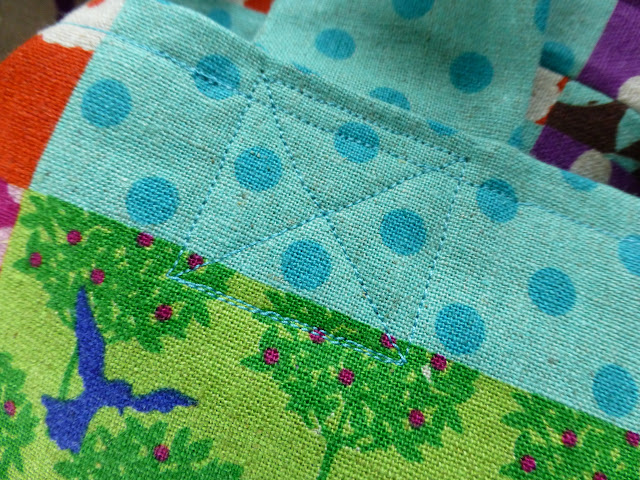
Now for the final stretch! Topstitch all the way round the top edge of the bag, nice and close to the edge. Finally stitch a criss-crossed box shape over each strap end that is sandwiched, neatly hidden between the layers of fabric, as I've done in the pic. This makes a good secure bond between the handles and the rest of the bag.


You have to feel where the ends of the straps are through the fabric but it's not difficult - mark the limit of the strap end with a pin if that helps. This method makes a nice neat finish on the inside with no raw edges of the straps showing, which I rather like.

Your bag is finished! Pull through and knot the loose threads neatly, snipping off the ends to tidy up; fill your bag and head out for whatever your summer day holds.

Going to be a scorcher? Add a bottle of water, a sunhat and a change of shoes for cool feet when your morning shoes become unbearably hot.

Threatens to rain? Pop in an umbrella or a cagoule.

Work beckons? Pile in your papers, a diary and a clutch of pens along with a pick-up-put-down little hooky project for those few, spare minutes between meetings.

A day free to go exploring or shopping? Stash away a quick picnic, a flask of tea and a book and leave plenty of room for loot!

And if you're like me and prone to feel chilly, don't forget, always to carry, that very English garment, a cardigan, without which Mrs T rarely ventures forth, although, hopefully, does not always have to wear!

Don't forget to leave me a comment if you'd like one of my Kokka Echino print bags - and let me know which you'd like best,

Kokka Echino "Flap Border Green"?


Kokka Echino "Perch Stripe Pink"?


or Kokka Echino "Perch Stripe Green"?


They're offered by way of a little thank you to all of you who read here. I appreciate your visits so very much and whether or not you'd like a bag, I send you a huge thank you for visiting, reading, following and taking the time to comment.

with love 
from Mrs T
 x


Crochet Bath Mat # 2 and "Easy Summer Living" Bag Giveaway Winners

$
0
0
My second crocheted bath mat has hit the floor! Took a bit longer to complete than I expected because when sewing the daisy hexagons together I discovered one or two rogue hexies with eleven petals instead of twelve. "Would anyone notice?", I asked myself."No, they wouldn't." But of course I had noticed and so I would in future notice; in fact every time I looked at it my eye was inexorably drawn to the offending missing petals. So with a certain amount of cursing, huffing and puffing I made myself unpick and redo the ones that were not quite right. If you spot any others that I haven't yet noticed, please don't tell me or I will have to redo those as well!


In the course of the unpicking, I also managed to snip the back of a perfectly good petal stitch which led to a bit of blue smoke and a lot of heated expletives. The one big downside of crochet as compared to knitting, I realise, is that it is virtually impossible to effect a repair of a damaged stitch unobtrusively. After my initial panic at realising what I'd done, I did however manage to pull the snipped ends through just enough to tie a new piece of yarn onto each end, thereby joining them together again, but it was touch and go. The join is on the back and doesn't show, I think, but it's a lesson to be a bit less scissor-happy in future!


Anyone else have any tips on repairing crochet without simply unravelling it and recrocheting? It occurs to me, for example, that, were any unwelcome moths to take a fancy to my blankets, any holes would be extraordinarily difficult to mend. Not too disastrous perhaps in a blanket made up of small, individual units, such as squares or hexagons, as the unit could be carefully cut out and redone, but fairly calamitous in a continuous piece of fabric such as my Sea-Ripple, which is fast reaching the finish line. I hope my cotton blankets are safer but it may be a good reason to stick to yarn not favoured by pesky moth larvae!


Anyway leaving aside such apocalyptic thoughts, I am very happy with my hexie daisy bath mat. Someone asked if I use any kind of backing for these. I don't and have found they are fine on their own but you could always sew on something non-slip if you wanted to. The nice thing about using cotton though, is that when damp, it's quite grippy anyway.

I have made my bath mat with a few more hexagons than the pattern in Sue's book (each of my rows has one more hexagon in it than the original pattern). This was to compensate for the fact that I was using a single strand of cotton yarn on its own, as opposed to a strand of cotton yarn and a strand of an acrylic together, so my hexagons came out a little bit smaller than Sue's. It's still quite compact which I really like - big enough to be practical to use, but not so big as to take ages to dry or, more significantly, to become too heavy when wet - this does not reflect a concern for the comfort of post-shower feet so much as a concern for my crochet becoming distorted! Priorities, people!


As with my first patchwork, Granny Square sampler, bath mat, I used a 4.5 mm hook and Rico Creative Cotton from my post-blanket stash, although alarmingly (or encouragingly, depending on how you look at it!), the stash pile doesn't seem to have diminished in size much!

Now on to the winners of my "Easy Summer Living" Bag giveaway. Thank you all so much for your lovely comments on them. Sorry, I haven't got enough to give a bag to all of you who wanted one. But if you haven't won one and want one, do give the pattern a go - it's really easy. And if you do hit any snags with the pattern or the instructions aren't clear, feel free to email me and I'll do my best to help.

The three winners, pulled, this time, in the old fashioned way, from a hooky hat, (well, a hooky bowl actually), are:

Elisa

MagsD

and Caroline Saunders

so if you could email me your postal addresses I will pop them in the post to you asap. (You can find my email address at the top of this page under the Contact Me tab.) I hope you enjoy using your bags and that we finally get some summery weather to fit their theme!

E x


In My Kitchen In May

$
0
0
Joining in with Celia's In My Kitchen series here, in my kitchen, in May, have been:

A huge number of eggs again. Pic very similar to that in my last "In My Kitchen" post back in March but I am afraid I love these bowls of eggs with the odd soft bantam feather among them.


The bantams have gone into overdrive over the last three months and I have been having trouble keeping up. So a lot of my cooking has been using their output: poached eggs on toast; omelettes; ice cream; cheesecake; tarte au citron (the tarte au citron, pictured below has won the prize so far of using the most eggs in one go, twelve bantam eggs went into this in total - ten whole eggs in the filling and two yolks in the pastry! I know, I know, not supposed to be good for you eating too many eggs, but this was a huge tart, eaten in small(ish!) slices!)


I have also made several jars of passionfruit curd. Homemade curd, of any kind, I think, is worth every slow minute of stirring even though it takes quite a long time to thicken properly. I usually make lemon or orange curd but when passionfruit are not too expensive, this is probably my favourite. Fabulous piled on scones; delectable in a sponge cake; sublime swirled into whipped cream and topped with mango or raspberries (or both) on a pavlova.


There has also been some experimenting with some recipes from Salt, Sugar And Smoke by Diana Henry which I got for Christmas but hadn't really explored properly, until recently:

Middle Eastern labneh cheese, made from homemade wholemilk yoghurt, drained overnight in a sieve lined with muslin, and then shaped and rolled in chopped fresh herbs, from the garden - mint, oregano, rosemary, thyme and chives all of which are now burgeoning and ready for picking.


The coated balls of soft cheese are then submerged in jars of olive oil.


Haven't tasted it yet because it needs a few days for the flavours to mature but it's looking good so far, I must say. Going to crank up the sourdough starter, currently sleeping in the fridge, and make a sourdough loaf to go with it, as per Diana Henry's recommendation.

Rhubarb, rose and cardamom jam from the same book.


I don't like rhubarb much as a general rule - I know I ought to somehow but I don't - it's just too sharp and too tannic. But the picture of this jam, in Salt, Sugar and Smoke, was just too alluring not to try and as the rhubarb patch outside the back door has been accusing me every time I go out there for not harvesting it, I thought I would give it a go. It's a revelation. The cardamom and rosewater take off all the unpleasant acidity and lend the finished jam a wonderful fragrance and exoticism. It's beautifully softly set too and slides easily atop plain, homemade yoghurt or chilled rice pudding (as in my pic below) to make an unexpectedly entrancing sweet finish to a meal.


Rice pudding, like rhubarb, isn't up there in my normal list of favourite puddings, certainly not served hot, but baked in a slow oven for a couple of hours, with a split vanilla pod and then chilled and served in small bowls, with a spoonful of this jam, which is really more of a French-style "confiture", slipped on top, it's a grown-up contender as a pudding that leaves its nursery cousin far behind. Think of it as "crème au riz" rather than "rice pudding", even if you just make it with milk and no cream - helps the perception no end, if you have bad memories of school rice pudding, and, as we all know, perception plays no small part in these things!

My pride and joy in the kitchen this month has been the first slender pickings from my juvenile asparagus crowns - steamed and eaten alone in all their solitary glory, enhanced only by a swift swirl of extra-virgin olive oil and some black pepper.


Other day to day offerings have included homemade malt loaf - basically an ordinary half white / half wholemeal flour loaf with a couple of generous handfuls of sultanas thrown in and with several, dark and viscous, spoonfuls of extract of malt added.


Making this always makes me think of Winnie-the-Pooh and the story "In Which Tigger Comes To The Forest And Has Breakfast" in which the bouncy and hungry Tigger does the rounds of Pooh and his friends in search of sustenance. Finding neither Pooh's honey nor the condensed milk Pooh spots in Kanga's larder, nor Piglet's "haycorns" nor Eeyore's thistles make much of an appealing breakfast (apart from the honey and condensed milk, who can blame him, quite honestly?!) he finally decides that extract of malt, is pretty much made for his purpose, even though it is disliked intensely by baby Roo, who is given it after meals as "Strengthening Medicine"! I am not sure I would give you a thank you for extract of malt neat on a spoon, (unlike my passionfruit curd, just because it is so delicious!) but as an ingredient in bread, extract of malt is great and, Tigger aside, this loaf toasts beautifully and keeps all week, which makes for quick and easy breakfasts when we are against the clock for school, as we usually are in the mornings.

Have a look at Celia's lovely blog here for peeks in other May kitchens.

E x
Viewing all 167 articles
Browse latest View live


Latest Images